Garmin GPS 24xd Receiver and Antenna Installation Instructions - Page 4
Surface Mounting the Antenna, NOTICE
 |
View all Garmin GPS 24xd Receiver and Antenna manuals
Add to My Manuals
Save this manual to your list of manuals |
Page 4 highlights
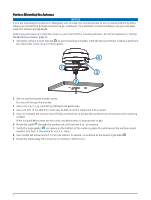
Surface Mounting the Antenna NOTICE If you are mounting the bracket on fiberglass with screws, it is recommended to use a countersink bit to drill a clearance counterbore through only the top gel-coat layer. This will help to avoid cracking in the gel-coat layer when the screws are tightened. Before you permanently mount the antenna, you must test the mounting location for correct operation (Testing the Mounting Location, page 3). 1 Using the surface-mount bracket as your mounting template, mark the three pilot-hole locations and trace the cable-hole in the center of the bracket. 2 Set the surface-mount bracket aside. Do not drill through the bracket. 3 Use a 3.2 mm (1/8 in.) drill bit to drill the three pilot holes. 4 Use a 25 mm (1 in.) drill bit or hole saw to drill or cut the cable hole in the center. 5 Use the included M4 screws and a Phillips screwdriver to secure the surface-mount bracket to the mounting surface. If the included M4 screws are too short, use M4 screws of appropriate length. 6 Route the cable through the center hole, and connect it to the antenna. 7 Verify the large gasket is in place on the bottom of the antenna, place the antenna on the surface-mount bracket, and twist it clockwise to lock it in place. 8 Use the M3 set screw and a 1.5 mm hex wrench to secure the antenna to the mounting bracket . 9 Route the cable away from sources of electronic interference. 4
-
 1
1 -
 2
2 -
 3
3 -
 4
4 -
 5
5 -
 6
6 -
 7
7 -
 8
8 -
 9
9 -
 10
10 -
11
-
12
-
13
-
14
-
15
-
16
 |
 |
