Garmin GPSMAP 64s Owner's Manual - Page 15
Long-Term Storage, Optional Accessories, Tips for Pairing ANT+ Accessories with Your, Garmin Device - buy
 |
View all Garmin GPSMAP 64s manuals
Add to My Manuals
Save this manual to your list of manuals |
Page 15 highlights
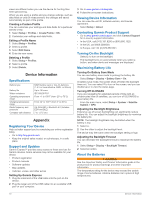
NOTICE Alkaline batteries lose a significant amount of their capacity as the temperature decreases. Use lithium batteries when operating the device in below freezing conditions. Selecting the Battery Type 1 From the main menu, select Setup > System > AA Battery Type. 2 Select Alkaline, Lithium, Traditional NiMH, or Precharged NiMH. Long-Term Storage When you do not plan to use the device for several months, remove the batteries. Stored data is not lost when batteries are removed. Optional Accessories Optional accessories, such as mounts, maps, fitness accessories, and replacement parts, are available at http: / / buy .garmin .com or from your Garmin dealer. tempe™ The tempe is an ANT + wireless temperature sensor. You can attach the sensor to a secure strap or loop where it is exposed to ambient air, and therefore, provides a consistent source of accurate temperature data. You must pair the tempe with your device to display temperature data from the tempe. Using Optional Fitness Accessories 1 Bring the device within 10 ft. (3 m) of the ANT + accessory. 2 Select Setup > Fitness. 3 Select Heart Rate Monitor or Bike Cadence Sensor. 4 Select Search For New. 5 Customize the data fields to view the heart rate or cadence data (Customizing the Data Fields). Tips for Pairing ANT + Accessories with Your Garmin Device • Verify that the ANT + accessory is compatible with your Garmin device. • Before you pair the ANT + accessory with your Garmin device, move 10 m (32. 9 ft. ) away from other ANT + accessories. • Bring the Garmin device within range 3 m (10 ft. ) of the ANT + accessory. • After you pair the first time, your Garmin device automatically recognizes the ANT + accessory each time it is activated. This process occurs automatically when you turn on the Garmin device and only takes a few seconds when the accessories are activated and functioning correctly. • When paired, your Garmin device receives data from only your accessory, and you can go near other accessories. Data Management NOTE: The device is not compatible with Windows 95, 98, Me, Windows NT®, and Mac OS 10. 3 and earlier. File Types The handheld device supports these file types. • Files from BaseCamp or HomePort™. Go to www.garmin.com/ trip _ planning. • GPX track files. • GPX geocache files. Go to www.garmin.com/ geocache. • GGZ geocache files. Go to www.garmin.com/ geocache. • JPEG photo files. • GPI custom POI files from the Garmin POI Loader. Go to www.garmin.com/ products / poiloader. Installing a Memory Card WARNING Do not use a sharp object to remove user-replaceable batteries. You can install a microSD memory card in the handheld device for additional storage or pre-loaded maps. 1 Turn the D-ring counter-clockwise, and pull up to remove the cover. 2 Remove the battery. 3 Slide the card holder À to and lift up. 4 Place the memory card with the gold contacts facing down. 5 Close the card holder. 6 Slide the card holder to to lock it. 7 Replace the battery and cover. Connecting the Device to Your Computer NOTICE To prevent corrosion, thoroughly dry the mini-USB port, the weather cap, and the surrounding area before charging or connecting to a computer. Before you can operate your device while connected to your computer, you must install batteries. The computer USB port may not provide enough power to operate the device. 1 Pull up the weather cap from the mini-USB port. 2 Plug the small end of the USB cable into the mini-USB port. 3 Plug the large end of the USB cable into a computer USB port. On Windows computers, the device appears as a removable drive or a portable device, and the memory card may appear as a second removable drive. On Mac computers, the device and memory card appear as mounted volumes. Transferring Files to Your Device 1 Connect the device to your computer. On Windows computers, the device appears as a removable drive or a portable device, and the memory card may appear as a second removable drive. On Mac computers, the device and memory card appear as mounted volumes. NOTE: Some computers with multiple network drives may not display device drives properly. See your operating system documentation to learn how to map the drive. 2 On your computer, open the file browser. 3 Select a file. 4 Select Edit > Copy. 5 Open the portable device, drive, or volume for the device or memory card. 6 Browse to a folder. 7 Select Edit > Paste. The file appears in the list of files in the device memory or on the memory card. Appendix 11
-
 1
1 -
2
-
3
-
4
-
5
-
6
-
7
-
8
-
9
-
 10
10 -
 11
11 -
 12
12 -
 13
13 -
 14
14 -
 15
15 -
 16
16 -
 17
17 -
 18
18
 |
 |