Garmin Montana 700 Owners Manual - Page 22
Sending and Receiving Data Wirelessly, Using the VIRB Remote, Custom Data Fields and Dashboards, - series
 |
View all Garmin Montana 700 manuals
Add to My Manuals
Save this manual to your list of manuals |
Page 22 highlights
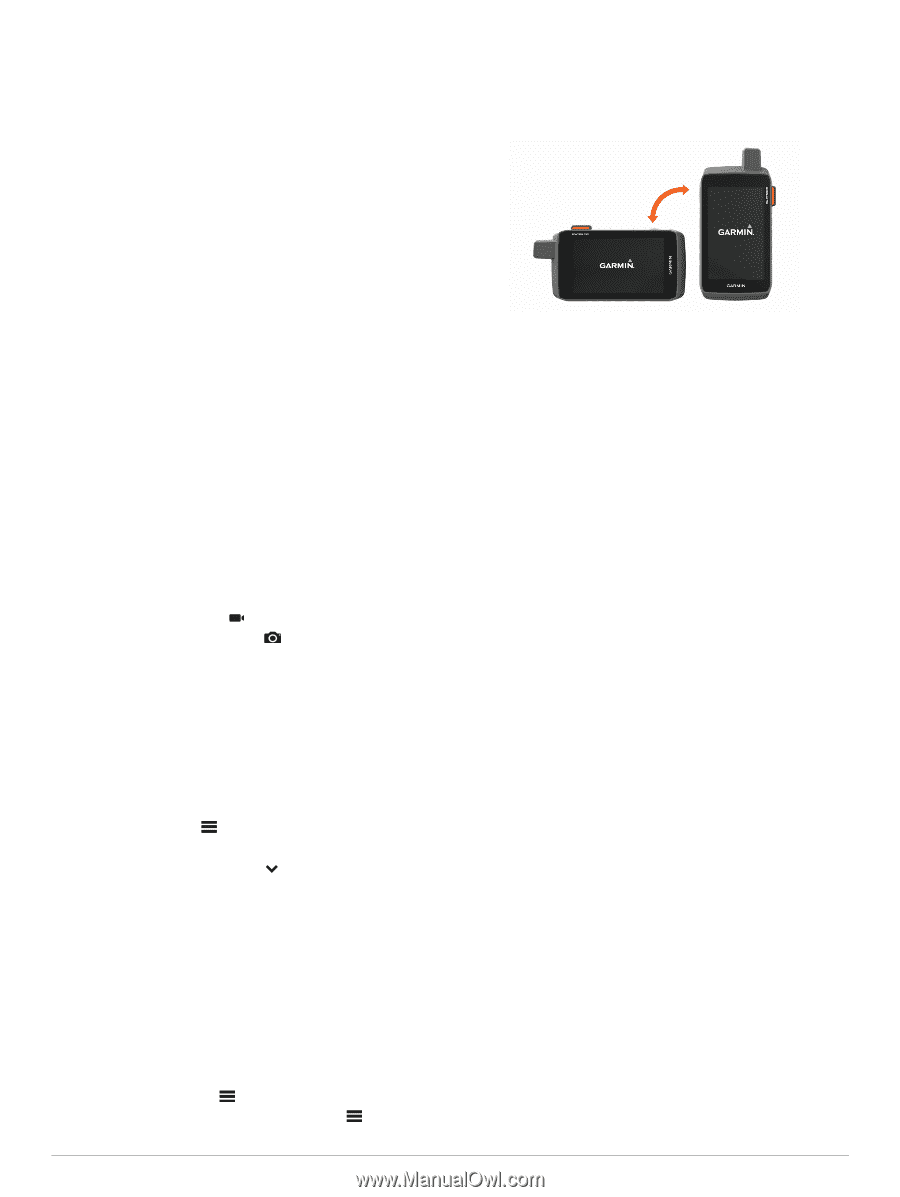
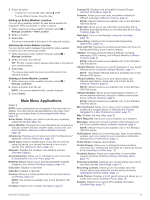
AutoLocate Position: Calculates your GPS position using the Garmin AutoLocate® feature. Satellite Setup: Sets the satellite system options (Satellite Settings, page 19). Sending and Receiving Data Wirelessly Before you can share data wirelessly, you must be within 3 m (10 ft.) of a compatible Garmin device. Your device can send and receive data wirelessly when connected with a compatible Garmin device using ANT+ technology. You can share waypoints, geocaches, routes, tracks, and more. 1 Select Share Wirelessly. 2 Select an option: • Select Send, and select a type of data. • Select Receive to receive data from another device. The other compatible device must be attempting to send data. 3 Follow the on-screen instructions. Using the VIRB Remote Before you can use the VIRB remote function, you must enable the remote setting on your VIRB camera. See the VIRB Series Owner's Manual for more information. The VIRB remote function allows you to control your VIRB action camera using your device. 1 Turn on your VIRB camera. 2 On your Montana device, select VIRB Remote. NOTE: You may need to add this application to the main menu before you can select it (Customizing the Main Menu, page 14). 3 Wait while the device connects to your VIRB camera. 4 Select an option: • To record video, select . • To take a photograph, select . Customizing the Device Custom Data Fields and Dashboards Data fields display information about your location or other specified data. Dashboards are a custom grouping of data that can be helpful to a specific or general task, such as geocaching. Enabling the Map Data Fields You can show custom data fields on the map. 1 From the map, select > Map Setup > Dashboard. 2 Select Large Data Field or Small Data Fields. 3 If necessary, on the map, select at the top of the screen to show the data fields. Customizing the Data Fields Before you can change the map data fields, you must enable them (Enabling the Map Data Fields, page 18). You can customize the data fields and dashboards of the map, compass, trip computer, and altimeter pages. 1 From a page that displays data fields, select a data field. 2 Select a data field category and a data field. Customizing Dashboards 1 Select a page. 2 Select an option: • From the map, select > Map Setup > Dashboard. • From the compass or trip computer, select > Change Dashboard. 3 Select a dashboard. Rotating the Screen Rotate your device to view in horizontal (landscape) or vertical (portrait) mode. NOTE: While using the inReach features of your Montana 700i/750i device, you should use the device in vertical (portrait) mode, with the antenna pointed toward the sky. Setup Menu Select Setup. System: Allows you to customize system settings (System Settings, page 19). Display: Adjusts the backlight and display settings (Display Settings, page 19). Bluetooth: Pairs your device to a smartphone or audio device, and allows you to customize the Bluetooth settings (Bluetooth Settings, page 19). Wi-Fi: Allows you to connect to wireless networks (Wi‑Fi Settings, page 20). Tracking: Allows you to customize the inReach tracking settings on your Montana 700i/750i device (inReach Tracking Settings, page 4). Messages: Allows you to customize the settings for inReach messages on your Montana 700i/750i device (Messages Settings, page 3). Map: Sets the map appearance (Map Settings, page 5). Recording: Allows you to customize activity recording settings (Recording Settings, page 10). Routing: Allows you to customize how the device calculates routes for each activity (Routing Settings, page 20). Expedition Mode: Allows you to customize settings for turning on expedition mode (Turning On Expedition Mode, page 20). Waypoints: Allows you to enter a custom prefix for automatically named waypoints. Tones: Sets the device sounds, such as alarm tones and alerts (Setting the Device Tones, page 20). Heading: Allows you to customize the compass heading settings (Heading Settings, page 6). Altimeter: Allows you to customize the altimeter settings (Altimeter Settings, page 6). Camera: Adjusts the camera settings on your Montana 750i device (Camera Settings, page 20). Geocaching: Allows you to customize your geocache settings (Geocaching Settings, page 20). Sensors: Pairs wireless sensors with your device (Wireless Sensors, page 20). Fitness: Allows you to customize settings for recording fitness activities (Fitness Settings, page 20). Marine: Sets the appearance of marine data on the map (Marine Settings, page 21). 18 Customizing the Device
-
 1
1 -
2
-
3
-
4
-
5
-
6
-
7
-
8
-
9
-
10
-
11
-
12
-
13
-
14
-
15
-
16
-
 17
17 -
 18
18 -
 19
19 -
 20
20 -
 21
21 -
 22
22 -
 23
23 -
 24
24 -
 25
25 -
 26
26 -
 27
27 -
28
-
29
-
30
-
31
-
32
-
33
-
34
 |
 |