Garmin PRO Control 2 Remote Launch System Owner s Manual PDF - Page 5
Introduction, Remote Training Devices
 |
View all Garmin PRO Control 2 Remote Launch System manuals
Add to My Manuals
Save this manual to your list of manuals |
Page 5 highlights
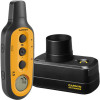
Introduction WARNING See the Important Safety and Product Information guide in the product box for product warnings and other important information. Charging the Handheld Device NOTICE To prevent corrosion, thoroughly dry the USB port, the weather cap, and the surrounding area before charging or connecting to a computer. NOTE: The device does not charge when it is outside the approved temperature range (PRO Control 2 Handheld Device Specifications, page 6). You should fully charge the battery before you use the device for the first time. Charging a fully depleted battery takes about 2 hours. 1 Lift the weather cap . À 3 Plug the large end of the USB cable into an AC adapter or a computer USB port. 4 Plug the AC adapter into a standard wall outlet. 5 Charge the device completely. The LED is solid red while charging. The LED is solid green when the device is fully charged. NOTE: The battery takes four hours to fully charge. Battery Status When the device is on, the status LED flashes every few seconds. The color of the status LED indicates the battery power level. Green Good battery power. Yellow Low battery power. Charge the battery soon. Red Critically low battery power or missing battery. Charge the battery immediately. Launching is disabled. Turning the Handheld Device On or Off The handheld device turns off automatically after you have not used it for one hour. You cannot turn off the device manually. NOTE: The device and LCD display use very little power while the device is not transmitting, and the one-hour delay does not significantly impact battery life. Select any key to turn on the device. The LCD display turns on, and the device keys can be used immediately. 2 Plug the small end of the power cable into the USB port on Á the device. 3 Plug the other end of the power cable into an appropriate power source. The LCD display on the handheld device shows the current battery charge level. Charging is complete when the battery charge level icon stops flashing. Charging the Receiver NOTICE To prevent corrosion, thoroughly dry the USB port, the weather cap, and the surrounding area before charging or connecting to a computer. NOTE: The device does not charge when it is outside the approved temperature range (PRO Control 2 Remote Receiver Device Specifications, page 6). 1 Lift the weather cap from the USB port. 2 Plug the small end of the power cable into the USB port. Turning the Receiver On and Off 1 Hold the power key until the LED is solid green to turn on the receiver. After you release the power key, the LED flashes to indicate the battery level (Battery Status, page 1). 2 Hold the power key until the LED is solid red to turn off the receiver. Selecting an Operating Mode The PRO Control 2 handheld device operates in either remote launcher mode or dog training mode. The features, display, and key functions change based on the mode. Select MODE to switch the operating mode. A training mode indicator appears at the bottom of the LCD display (Dog Training Display, page 4) when the device is in dog training mode. Remote Training Devices The PRO Control 2 handheld device can control up to 18 compatible PRO Control series receivers. A PRO Control series receiver can activate several brands of third-party devices, including remote launchers, remote releasers, and other remote accessories. Each receiver includes a speaker to play a sound and two ports to connect remote devices. Your PRO Control 2 handheld device can remotely activate the sound and two remote devices on each receiver. You can also use the rapid launch feature to activate multiple devices in rapid succession. Introduction 1
-
 1
1 -
 2
2 -
 3
3 -
 4
4 -
 5
5 -
 6
6 -
 7
7 -
 8
8 -
 9
9 -
 10
10 -
 11
11 -
12
-
13
-
14
 |
 |
