Garmin VIRB XE Cycling Bundle Owners Manual - Page 6
Attaching the Device to the Mount, Turning On the Device, Home Screen Overview
 |
View all Garmin VIRB XE Cycling Bundle manuals
Add to My Manuals
Save this manual to your list of manuals |
Page 6 highlights
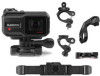
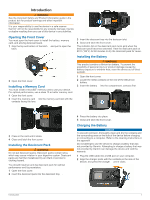
3 Charge the battery completely. Saving Energy While Charging the Device You can turn off the device screen and all other features while charging. 1 Connect your device to an external power source. 2 Hold POWER for 4 to 5 seconds. The screen turns off, and the device goes into a low power, battery charging mode. 3 Charge the device completely. Attaching the Device to the Mount NOTICE To prevent product loss or damage, do not use the adhesive mounting base when the temperature is below -15°C (5°F). The permanent mounting adhesive is extremely difficult to remove after it is installed. Before you can install the adhesive mounting base onto a surface, the ambient temperature must be from 21° to 38°C (from 70° to 100°F). Your device includes an assortment of mounting bases and arms, which can be used in many configurations. These instructions provide an example of one possible configuration. You can also purchase additional mounts for your device, such as wearable mounts, vehicle mounts, or a tripod mount. Go to www.garmin.com/VIRB for more information. NOTE: By default, the device should be mounted with the screen facing up to record correctly oriented video. You can adjust the settings to record with the screen facing down (Inverting the Camera Orientation, page 8). 1 Thoroughly clean and dry the mounting surface using water or alcohol. The mounting surface must be free of dirt, debris, wax, or coatings. 2 Remove the film from the adhesive mounting base , and À press the base firmly onto the mounting surface. You can use either the flat base or the curved base, depending on the contour of the mounting surface. 3 Allow the base to bond to the mounting surface for at least 24 hours. 4 Insert the adapter into the base. Á The lever must be in the open position.  5 Snap the lever to the closed position to lock the adapter into the base. The lever should be flush with the base. 6 Insert the camera mount into the top of the adapter. à 2 The device should be horizontal for the proper aspect ratio when recording video. 7 Insert a thumbscrew into the larger opening of the joint, Ä and tighten the thumbscrew to lock the angle of the joint. NOTE: The metal fitting indicates the smaller opening of the joint. 8 If necessary, insert the included hex wrench into the end of the thumbscrew to adjust the tightness of the joint. Keys MENU À POWER Á OK  Select to scroll through sensor status screens, data screens, and menu items. Hold to open the menu. Select to scroll through sensor status screens, data screens, and menu items. Hold to turn the device on or off. Select to choose menu options or to take a photo. Recording à switch Move the switch to start or stop recording video. Turning On the Device Select POWER. Turning Off the Device NOTICE To prevent loss of data, always turn off the device before removing the battery. NOTE: You cannot turn off the device while recording video. 1 If necessary, move the recording switch backward to stop recording video. 2 Hold POWER. The device saves your data and turns off. If you need to remove the battery, wait until the screen and the recording light turns off before removing the battery. Turning the Device On and Off Using the Recording Switch You can use the recording switch to turn the device on and off in recording mode. This feature allows you to start recording quickly, while automatically turning off the device to conserve battery power when you are not recording. NOTE: The device does not turn off using the recording switch unless you use the recording switch to turn on the device. 1 With the device turned off, move the recording switch forward. The device turns on and starts recording video. 2 When you are finished recording, move the recording switch backward. The device stops recording and turns off. Home Screen Overview The home screen provides at-a-glance details about the remaining memory card space and current settings of your device. Introduction
-
 1
1 -
 2
2 -
 3
3 -
 4
4 -
 5
5 -
 6
6 -
 7
7 -
 8
8 -
 9
9 -
 10
10 -
 11
11 -
 12
12 -
13
-
14
-
15
-
16
 |
 |
