Garmin Volvo Penta Glass Cockpit System Owner's Manual - Page 7
Device Overview, Inserting a Memory Card, Using the Touchscreen, Tips and Shortcuts, GPS Satellite - volvo penta glass cockpit systems
 |
View all Garmin Volvo Penta Glass Cockpit System manuals
Add to My Manuals
Save this manual to your list of manuals |
Page 7 highlights
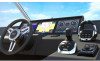
Introduction WARNING See the Important Safety and Product Information guide in the product box for product warnings and other important information. After more than 100 years in the maritime industry, the name Volvo Penta has come to symbolize reliability, technical innovation, first-class performance, and long life. We believe that these qualities correspond well to the demands and expectations you have of your Volvo Penta product. The Volvo Penta Glass Cockpit, designed in a collaboration between Volvo Penta and Garmin®, has a new user interface that includes instrumentation for navigation and communications equipment. The monitors are fully integrated with Volvo Penta drive systems and other instruments. In order for you to enjoy everything you would expect from the product, we ask that you read through the instruction manual carefully and take note of our advice on boat operations and maintenance before you make your first trip. Pay attention to the safety instructions in the manual. We would also like to welcome you to our world-wide network of distributors and repair shops, which can help you with technical advice, service, and spare parts. The Garmin website at www.garmin.com presents up-to-date information about your product. The support pages will provide answers to frequently asked support questions, and you can download software and chart updates. There is also contact information to Garmin support should you have any questions. You can locate your nearest Volvo Penta dealer through the integrated dealer locator in the Glass Cockpit or by visiting our website at www.volvopenta.com. Welcome aboard! Device Overview The location of items varies based upon the model. 2 Insert the memory card Á with the label facing away from the door. 3 Press the card in until it clicks. 4 Close the card reader door. Using the Touchscreen • Tap the screen to select an item. • Drag or swipe your finger across the screen to pan or scroll. • Pinch two fingers together to zoom out. • Spread two fingers apart to zoom in. Locking the Touchscreen You can lock the touchscreen to prevent inadvertent screen touches. 1 Select . 2 Select Lock Touchscreen. Tips and Shortcuts • Select Home from any screen to return to the Home screen. • Select Menu from any main screen to access additional settings about that screen. • Press to adjust the backlight and lock the touchscreen. • Hold to turn the chartplotter on or off. GPS Satellite Signals When you turn on the chartplotter, the GPS receiver must collect satellite data and establish the current location. When the chartplotter acquires satellite signals, appears at the top of the Home screen. When the chartplotter loses satellite signals, disappears and a flashing question mark appears over on the chart. For more information about GPS, go to www.garmin.com / aboutGPS. À Power key Á Automatic backlight sensor  Status bar that shows active alarms and functions Inserting a Memory Card You can use optional memory cards in the chartplotter. Map cards allow you to view high-resolution satellite imagery and aerial reference photos of ports, harbors, marinas, and other points of interest. You can use blank memory cards to transfer data such as waypoints, routes, and tracks to another compatible chartplotter or a computer. 1 Open the door À on the memory card reader. Stations and Station Layouts When multiple displays are installed on the Garmin Marine Network, you can group them together into a station. A station enables the displays to work together, rather than as several separate displays. When you select Home on one display, each display in the station returns to the Home screen. With the SmartMode™ feature, when a button is selected from the Home screen, each display in the station can show unique information. For example, when Cruising is selected from the Home screen, one display can show the Navigation chart and another display can show the Radar screen. You can customize the layout of the pages on each display, making each page different on each display. When you change the layout of a page in one display, the changes appear only on that display. When you change the name and symbol of the layout, those changes appear on all displays in the station, to maintain a consistent appearance. Introduction 1
-
 1
1 -
 2
2 -
 3
3 -
 4
4 -
 5
5 -
 6
6 -
 7
7 -
 8
8 -
 9
9 -
 10
10 -
 11
11 -
 12
12 -
13
-
14
-
15
-
16
-
17
-
18
-
19
-
20
-
21
-
22
-
23
-
24
-
25
-
26
-
27
-
28
-
29
-
30
-
31
-
32
-
33
-
34
-
35
-
36
-
37
-
38
 |
 |
