Garmin eTrex Touch 25 Owners Manual - Page 7
Marking and Starting Navigation to a Man - accessories
 |
View all Garmin eTrex Touch 25 manuals
Add to My Manuals
Save this manual to your list of manuals |
Page 7 highlights
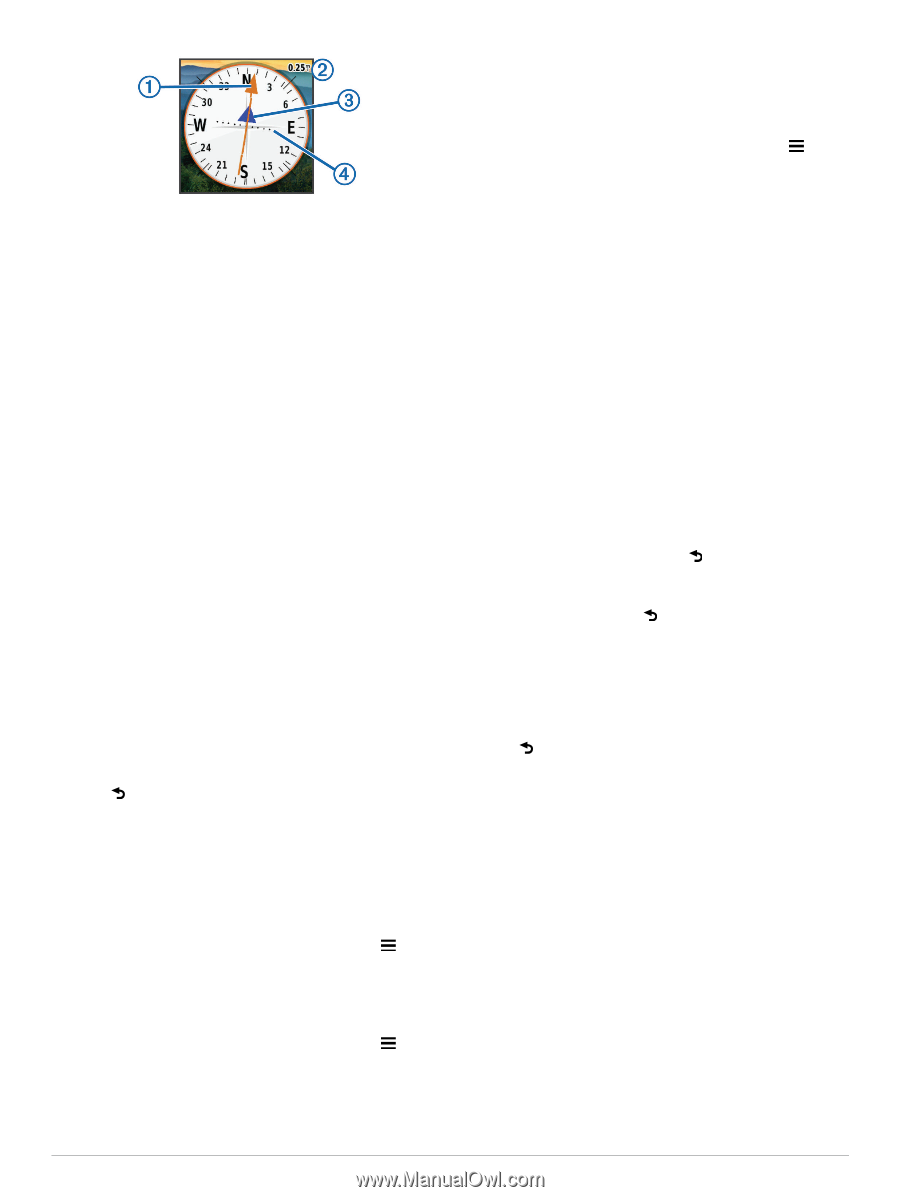
calibrate the barometric altimeter if you know the correct elevation or the correct barometric pressure. 1 Go to a location where the elevation or barometric pressure is known. 2 Select Elevation Plot. 3 Swipe up from the bottom of the screen, and select > Calibrate Altimeter. 4 Follow the on-screen instructions. The course pointer indicates your relationship to the course À line leading to the destination. The course deviation indicator (CDI) provides the indication of drift (right or left) from the Á course. The scale refers to the distance between dots on  à the course deviation indicator, which tell you how far off course you are. Marking and Starting Navigation to a Man Overboard Location You can save a man overboard (MOB) location, and automatically start navigation back to it. 1 Select Man Overboard > Start. The map opens showing the route to the MOB location. The default appearance of the route is a magenta line. 2 Navigate using the map (Navigating with the Map, page 4) or compass (Navigating with the Compass, page 4). Navigating with Sight 'N Go You can point the device at an object in the distance, lock in the direction, and navigate to the object. 1 Select Sight 'N Go. 2 Point the device at an object. 3 Select Lock Direction > Set Course. 4 Navigate using the compass. Elevation Plot By default, the elevation plot displays the elevation over the distance traveled. To customize the elevation settings, see Altimeter Settings, page 10. You can touch any point on the plot to view details about that point. Navigating to a Point on the Plot 1 Select Elevation Plot. 2 Select an individual point on the plot. 3 Select . 4 Select the information bar at the top of the screen. 5 Navigate using the map (Navigating with the Map, page 4) or compass (Navigating with the Compass, page 4). Changing the Plot Type You can change the elevation plot to display pressure and elevation over time or distance. 1 Select Elevation Plot. 2 Swipe up from the bottom of the screen, and select > Change Plot Type. 3 Select an option. Resetting the Elevation Plot 1 Select Elevation Plot. 2 Swipe up from the bottom of the screen, and select > Reset > Clear Current Track > Clear. Calibrating the Barometric Altimeter Your device was already calibrated at the factory, and the device uses automatic calibration by default. You can manually Geocaches A geocache is like a hidden treasure. Geocaching is when you hunt for hidden treasures using GPS coordinates posted online by those hiding the geocache. Downloading Geocaches 1 Connect the device to your computer using a USB cable. 2 Go to www.garmin.com/geocaching. 3 If necessary, create an account. 4 Sign in. 5 Follow the on-screen instructions to find and download geocaches to your device. Filtering the Geocache List You can filter your geocache list based on certain factors, such as the level of difficulty. 1 Select Geocaching > Quick Filter. 2 Select one or more items to filter. 3 Customize the settings, and select . 4 Select an option: • To apply the filter to the geocache list, select Search . • To save the filter, select . Creating and Saving a Geocache Filter You can create and save custom filters for geocaches based on specific factors. After you set up the filter, you can apply it in the geocaches list. 1 Select Setup > Geocaching > Filter Setup > Create Filter. 2 Select filter options. 3 Select . The filter is named automatically. Editing a Custom Geocache Filter 1 Select Setup > Geocaching > Filter Setup. 2 Select a filter. 3 Select an item to edit. Navigating to a Geocache 1 Select Geocaching > Find a Geocache. 2 Select a geocache. 3 Select Go. 4 Navigate using the map (Navigating with the Map, page 4) or compass (Navigating with the Compass, page 4). chirp™ A chirp is a small Garmin accessory that is programmed and left in a geocache. You can use your device to find a chirp in a geocache. For more information about the chirp, see the chirp Owner's Manual at www.garmin.com. Enabling chirp Searching 1 Select Setup > Geocaching. Geocaches 5
-
 1
1 -
 2
2 -
 3
3 -
 4
4 -
 5
5 -
 6
6 -
 7
7 -
 8
8 -
 9
9 -
 10
10 -
 11
11 -
 12
12 -
13
-
14
-
15
-
16
-
17
-
18
 |
 |