Garmin echo 150 Installation Instructions - Page 2
InstallinG the Transom-Mount Hardware - cover
 |
View all Garmin echo 150 manuals
Add to My Manuals
Save this manual to your list of manuals |
Page 2 highlights
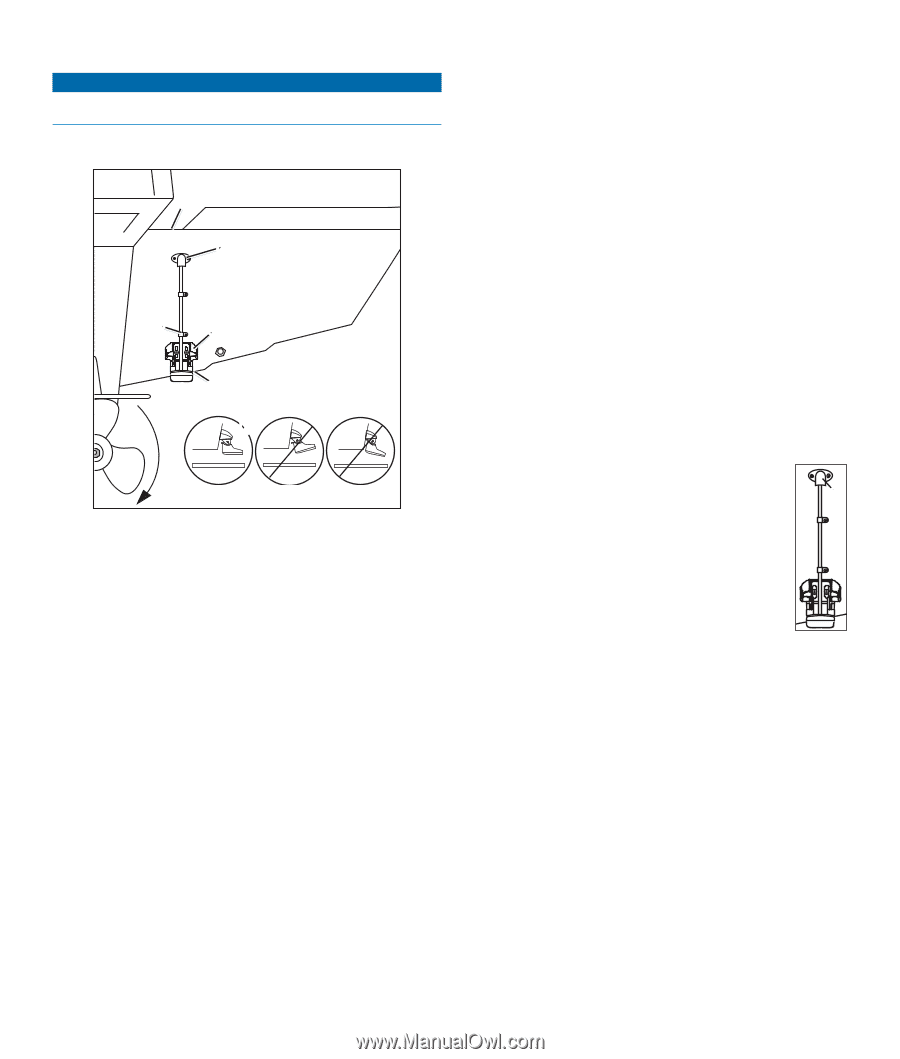
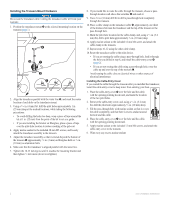
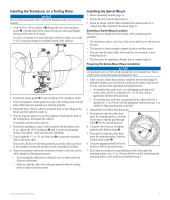
Installing the Transom-Mount Hardware Notice Do not cut the transducer cable. Cutting the transducer cable will void your warranty. 1. Position the transducer mount ➊ at the selected mounting location on the transom (page 1). ➏ ➍ ➎➊ ➌ ➋ 2. Align the transducer parallel with the water line ➋, and mark the center location of each hole on the transducer mount. 3. Using a 5/32 in. (4 mm) bit, drill the pilot holes approximately 1 in. (25 mm) deep at the marked locations, while taking the following precautions. • To avoid drilling the holes too deep, wrap a piece of tape around the bit at 1 in. (25 mm) from the point of the bit to act as a guide. • If you are installing the bracket on fiberglass, place a piece of tape over the pilot-hole location to reduce cracking of the gel-coat. 4. Apply marine sealant to the included 30 mm M5 screws, and loosely attach the transducer assembly to the transom. 5. Adjust the transducer assembly so that it extends beyond the bottom of the transom ➌ approximately 1/8 in. (3 mm) on fiberglass hulls or 3/8 in. (10 mm) on aluminum hulls 6. Make sure that the transducer is aligned parallel with the water line. 7. Tighten the 10-32 locking nut until it touches the mounting bracket and then tighten 1/4 turn more (do not overtighten). 8. If you would like to route the cable through the transom, choose a passthrough location well above the waterline ➍ and mark it. 9. Use a 5/8 in. (16 mm) drill bit to drill a pass-through hole completely through the transom. 10. Place a cable clamp on the transducer cable ➎, approximately one third of the distance between the transducer and the top of the transom or the pass-through hole. 11. Mark the pilot-hole location for the cable clamp, and, using a 1/8 in. (3.2 mm) bit, drill a pilot hole approximately 3/8 in. (10 mm) deep. 12. Apply marine sealant to the included 12 mm M4 screw, and attach the cable clamp to the transom. 13. Repeat steps 10-12 using the other cable clamp. 14. Route the transducer cable to the echo device. • If you are routing the cable using a pass-through hole, feed it through the hole you drilled in step 8, and install the cable-entry cover ➍ (page 2). • If you are not routing the cable using a pass-through hole, route the cable up and over the top of the transom ➏. Avoid routing the cable close to electrical wires or other sources of electrical interference. Installing the Cable-Entry Cover If you routed the cable through the transom after you installed the transducer, install the cable entry cover to keep water from entering your boat. 1. Place the cable-entry cover ➊ over the hole and the cable, with the opening pointing downward, and mark the location ➊ of the two pilot holes. 2. Remove the cable-entry cover, and, using a 1/8 in. (3.2 mm) bit, drill the pilot holes approximately 3/8 in. (10 mm) deep. 3. Fill the pass-through hole with marine sealant so that it covers the cable completely, and that there is excess sealant around the hole and the cable. 4. Place the cable-entry cover ➊ over the hole and the cable, with the opening pointing downward. 5. Apply marine sealant to the included 12 mm M4 screws, and attach the cable-entry cover to the transom. 6. Wipe away any excess marine sealant. 2 echo Installation Instructions
-
 1
1 -
 2
2 -
 3
3 -
 4
4 -
 5
5 -
 6
6
 |
 |