Garmin echo 150 Installation Instructions - Page 4
InstallinG the Cables and Connectors - installation
 |
View all Garmin echo 150 manuals
Add to My Manuals
Save this manual to your list of manuals |
Page 4 highlights
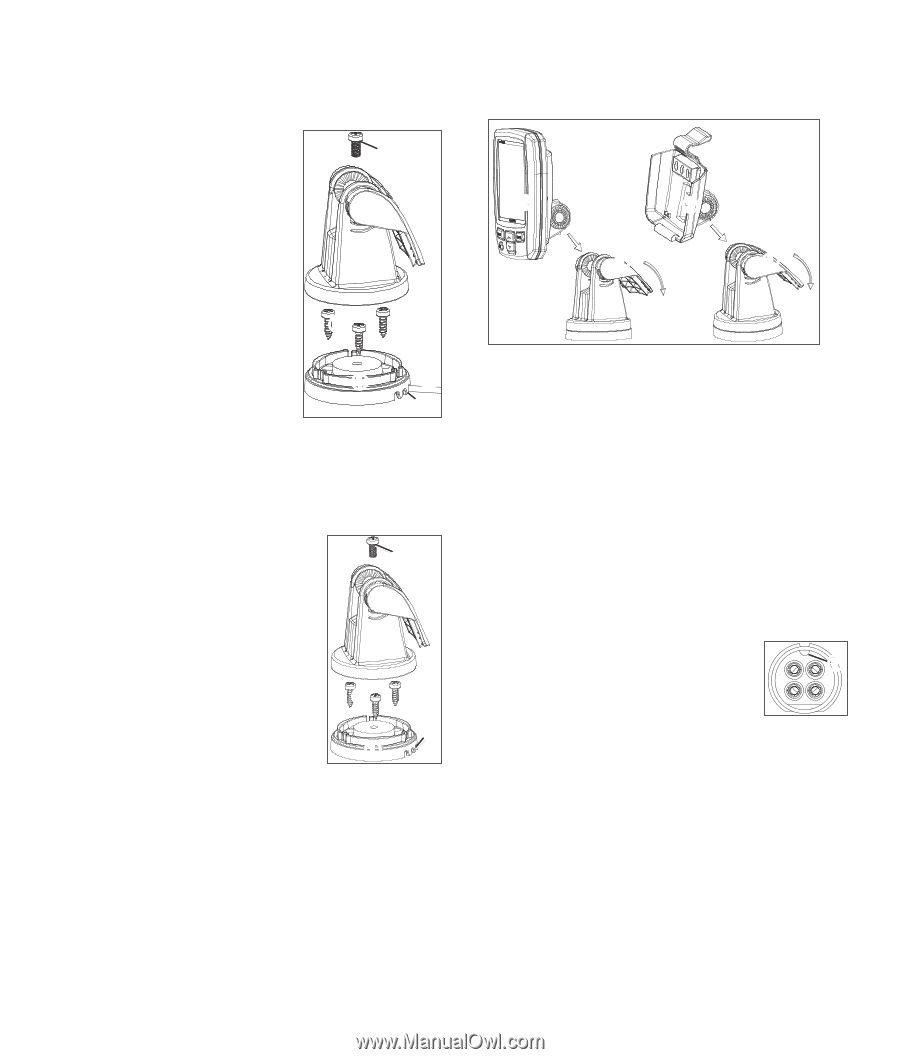
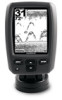
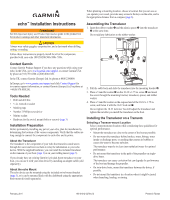
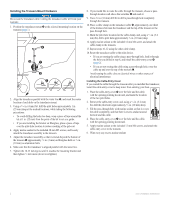
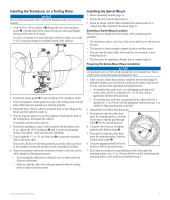
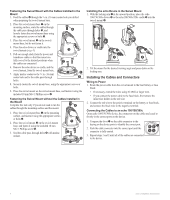
Fastening the Swivel Mount with the Cables Installed in the Mount 1. Feed the cables ➏ through the 5/8 in. (16 mm) center hole you drilled when preparing the swivel-mount base. 2. Place the swivel-mount base ➊ on the mounting surface, route the cables through the cable pass-through holes ➎, and ➍ loosely fasten the swivel-mount base using the appropriate screws or bolts ➋. 3. Place the swivel mount ➌ on the swivelmount base, but do not fasten it. 4. Place the echo device or cradle into the swivel mount (page 4). ➌ 5. Pull out enough slack from the power and transducer cables so that the mount can fully swivel to the desired positions when ➋ the cables are connected. 6. Remove the echo device or cradle, and the swivel mount, from the swivel-mount base. 7. Apply marine sealant to the 5/8 in. (16 mm) center hole and to the cable pass-through holes. ➊➏ ➎ 8. Securely fasten the swivel-mount base, using the appropriate screws or bolts. 9. Place the swivel mount on the swivel-mount base, and fasten it using the included 10 mm M6×1 Phillips screw ➍. Fastening the Swivel Mount without the Cables Installed in the Mount Complete this task only if you do not need to run the ➍ cables through the mounting surface and the mount. 1. Place the swivel-mount base ➊ on the mounting surface, and fasten it using the appropriate screws or bolts ➋. 2. Place the swivel mount ➌ on the swivel-mount ➌ base, and fasten it using the included 10 mm M6×1 Phillips screw ➍. 3. Seal the cable pass-through holes ➎ with marine ➋ sealant. ➎ ➊ Installing the echo Device in the Swivel Mount 1. With the locking arm ➊ in the upward position, place the echo 100/150/300c device ➋ or the echo 200/500c/550c cradle ➌ into the swivel mount ➍. ➋ ➌ ➊ ➊ ➍ ➍ 2. Tilt the mount for the desired viewing angle and press down on the locking arm. Installing the Cables and Connectors Wiring to Power 1. Route the power cable from the swivel mount to the boat battery or fuse block. • If necessary, extend the wires using 20 AWG or larger wire. • If you connect the power cable to the fuse block, first remove the inline fuse holder on the red wire. 2. Connect the red wire to the positive terminal on the battery or fuse block, and connect the black wire to the negative terminal. Connecting the Cables to an echo 100/150/300c On an echo 100/150/300c device, the connectors on the cables are keyed to fit only in the correct ports on the device. 1. Compare the divot ➊ on the cable connector to the keying on the device ports to identify the correct port. ➊ 2. Push the cable connector into the correct port until the connector is fully seated. 3. Repeat steps 1 and 2 until all of the cables are connected to the device. 4 echo Installation Instructions
-
 1
1 -
 2
2 -
 3
3 -
 4
4 -
 5
5 -
 6
6
 |
 |