Garmin zumo XT Owners Manual - Page 19
Viewing Traffic on the Map, Viewing the Owner's Manual on Your Device, Media Player, BirdsEye
 |
View all Garmin zumo XT manuals
Add to My Manuals
Save this manual to your list of manuals |
Page 19 highlights
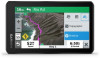
Traffic data is not available in all areas. For information about traffic coverage areas, go to garmin.com/traffic. Connect the device to vehicle power using the traffic compatible power cable (Mounting Your Device in an Automobile, page 3). If your product model includes traffic data, the vehicle power cable included with your device is traffic compatible. When you are within a traffic coverage area, your device can display traffic information and help you avoid traffic delays. Traffic Receiver Subscriptions A regional traffic data subscription is included with most traffic receivers. You can add subscriptions for additional regions to your traffic receiver. For more information, go to garmin.com /traffic. Viewing Traffic Subscriptions Select Settings > Traffic > Subscriptions. Adding a Subscription You can purchase traffic subscriptions for other regions or countries. 1 Select Settings > Traffic. 2 Select Subscriptions > . 3 Write down the FM traffic receiver unit ID. 4 Go to garmin.com/fmtraffic to purchase a subscription and get a 25-character code. The traffic subscription code cannot be reused. You must obtain a new code each time you renew your service. If you own multiple FM traffic receivers, you must obtain a new code for each receiver. 5 Select Next on the device. 6 Enter the code. 7 Select Done. Viewing Traffic on the Map The traffic map shows color-coded traffic flow and delays on nearby roads. 1 From the main menu, select Apps > Traffic. 2 If necessary, select > Legend to view the legend for the traffic map. Searching for Traffic Incidents 1 From the main menu, select Apps > Traffic. 2 Select > Incidents. 3 Select an item in the list. 4 If there is more than one incident, use the arrows to view additional incidents. Using the Apps Viewing the Owner's Manual on Your Device You can view the complete owner's manual on the device screen in many languages. 1 Select Apps > Owner's Manual. The owner's manual appears in the same language as the software text. 2 Select to search the owner's manual (optional). Media Player The media player can play music or audio from these sources. • Music files stored on your zūmo device. • Bluetooth audio from a paired phone. Adding the Music Player Tool to the Map The music player map tool enables you to control the music player from your map. 1 Open the map. 2 Select > Music Player. The music player controls appear on the map. Changing the Media Source You can change the source from which media is played on your device. 1 Select Music. 2 Select the current media source . 3 Select an available media source from the list. BirdsEye Imagery BirdsEye imagery provides downloadable, high-resolution map imagery, including detailed satellite imagery and raster-based topographical maps. You can download BirdsEye imagery directly to your device when it is connected to a Wi‑Fi network. Downloading BirdsEye Imagery Before you can download BirdsEye imagery directly to your device, you must connect to a wireless network (Connecting to a Wi‑Fi Network, page 19). 1 Select BirdsEye Direct. 2 Select . 3 Select an option: • To download BirdsEye imagery files for a specific location or area, select Location, and select a category. NOTE: The location defaults to your current location. • To select an image quality option, select Detail. • To define the size of the area to be shown in the downloaded imagery files, select Size, and enter a distance from the selected location. • To select where to save the downloaded imagery, select Save To. 4 Select Download. 5 Enter a name for the downloaded imagery and select Done. Trip Planner You can use the trip planner to create and save a trip, which you can navigate later. This can be useful for planning a delivery route, a vacation, or a road trip. You can edit a saved trip to further customize it, including reordering locations, optimizing the order of stops, adding suggested attractions, and adding shaping points. You can also use the trip planner to edit and save your active route. Planning a Trip A trip can include many destinations, and it must include at least a starting location and one destination. The starting location is the location from which you plan to start your trip. If you start navigating the trip from a different location, the device gives you the option to route to your starting location first. For a round trip, the starting location and final destination can be the same. Using the Apps 15
-
 1
1 -
2
-
3
-
4
-
5
-
6
-
7
-
8
-
9
-
10
-
11
-
12
-
13
-
 14
14 -
 15
15 -
 16
16 -
 17
17 -
 18
18 -
 19
19 -
 20
20 -
 21
21 -
 22
22 -
 23
23 -
 24
24 -
25
-
26
-
27
-
28
-
29
-
30
 |
 |
