Gastroback 40117 User Manual - Page 8
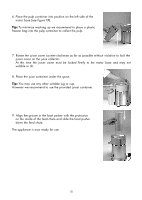
However we recommend to use the provided juicer container.
 |
View all Gastroback 40117 manuals
Add to My Manuals
Save this manual to your list of manuals |
Page 8 highlights
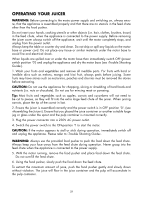
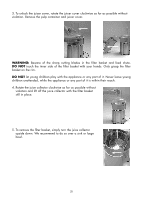
6. Place the pulp container into position on the left side of the motor base (see figure XX). Tip: To minimize washing up we recommend to place a plastic freezer bag into the pulp container to collect the pulp. 7. Rotate the juicer cover counter-clockwise as far as possible without violation to lock the juicer cover on the juice collector. At this time the juicer cover must be locked firmly to the motor base and may not wobble or tilt. 8. Place the juice container under the spout. Tip: You may use any other suitable jug or cup. However we recommend to use the provided juicer container. 9. Align the groove in the food pusher with the protrusion on the inside of the feed chute and slide the food pusher down the feed chute. The appliance is now ready for use. 32
-
 1
1 -
2
-
 3
3 -
 4
4 -
 5
5 -
 6
6 -
 7
7 -
 8
8 -
 9
9 -
 10
10 -
 11
11 -
 12
12 -
 13
13 -
14
-
15
-
16
-
17
-
18
-
19
-
20
-
21
-
22
-
23
-
24
 |
 |
