Gateway 7405GX Hardware Reference - Page 50
Step 11, way across.
 |
View all Gateway 7405GX manuals
Add to My Manuals
Save this manual to your list of manuals |
Page 50 highlights
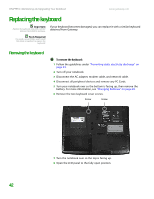
CHAPTER 3: Maintaining and Upgrading Your Notebook www.gateway.com 4 Insert the tabs on the front edge of the keyboard into the slot under the palm rest. It may be necessary to press down on the keyboard keys along the front edge of the keyboard to seat the retaining tabs into their corresponding slots. Caution If the cover is not correctly replaced, your notebook could be damaged when you try to close the LCD panel. 5 Gently press the keyboard down until it is flat all the way across. The keyboard should easily fall into place. Be careful not to damage the LCD panel. 6 Secure the keyboard with the two screws removed in Step 11. 7 Place the keyboard cover on the notebook. Press down on the cover in several places until it clicks in place. The keyboard cover is correctly mounted when you can run your finger along the cover and find no loose spots. The cover should be flat all the way across. 8 Press down on the hinge covers until they click in place. 9 Secure the keyboard cover with the two screws removed in Step 6. 10 Insert the battery, then turn your notebook over. 11 Connect the power adapter, the modem cable, and the network cable, then turn on your notebook. 46
-
 1
1 -
2
-
3
-
4
-
5
-
6
-
7
-
8
-
9
-
10
-
11
-
12
-
13
-
14
-
15
-
16
-
17
-
18
-
19
-
20
-
21
-
22
-
23
-
24
-
25
-
26
-
27
-
28
-
29
-
30
-
31
-
32
-
33
-
34
-
35
-
36
-
37
-
38
-
39
-
40
-
41
-
42
-
43
-
44
-
 45
45 -
 46
46 -
 47
47 -
 48
48 -
 49
49 -
 50
50 -
 51
51 -
 52
52 -
 53
53 -
 54
54 -
 55
55 -
56
-
57
-
58
-
59
-
60
-
61
-
62
-
63
-
64
-
65
-
66
-
67
-
68
 |
 |
