Gateway 838GM User Guide - Page 19
Plug a Personal System/2 - power supply
 |
View all Gateway 838GM manuals
Add to My Manuals
Save this manual to your list of manuals |
Page 19 highlights
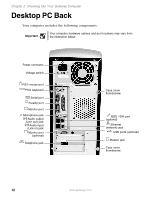
Desktop PC Back Component Power connector Voltage switch PS/2 mouse port Icon Description Plug the power cord into this connector. Before turning on your computer, make sure that this switch is in the correct position for the correct power available. The switch is preset at the factory with the correct voltage for your area. In the United States, the utility power is supplied at a nominal 115 volts at 60 Hz. The power supply should always be set to this when your computer is operating in the United States. In other areas of the world, such as Europe, the utility power is supplied at 230 volts at 50 Hz. If your computer is operating in an environment such as this, the voltage switch should be moved to 230. Plug a Personal System/2® (PS/2) mouse into this port. PS/2 keyboard port Serial port Parallel port Monitor port Microphone jack Audio output (Line out) jack Audio input (Line in) jack Monitor port (optional) Telephone jack (optional) Case cover thumbscrews Plug a PS/2 keyboard into this port. Plug a serial device (such as a digital camera) into this port. For more information, see "Installing a printer, scanner, or other peripheral device" on page 32. Plug a parallel device (such as a printer) into this port. For more information, see "Installing a printer, scanner, or other peripheral device" on page 32. Plug a monitor into this port unless you have an add-in video port. Plug a microphone into this jack. This jack is color-coded red or pink. Plug powered, analog front speakers, an external amplifier, or headphones into this jack. This jack is color-coded lime green. Plug an external audio input source (such as a stereo) into this jack so you can record sound on your computer. This jack is color-coded blue. If you have this optional monitor port, plug your monitor in here. This port provides advanced display features. If your modem has a telephone jack, plug the cable for a telephone into this jack. Remove these screws before opening the case. www.gateway.com 13
-
 1
1 -
2
-
3
-
4
-
5
-
6
-
7
-
8
-
9
-
10
-
11
-
12
-
13
-
 14
14 -
 15
15 -
 16
16 -
 17
17 -
 18
18 -
 19
19 -
 20
20 -
 21
21 -
 22
22 -
 23
23 -
 24
24 -
25
-
26
-
27
-
28
-
29
-
30
-
31
-
32
-
33
-
34
-
35
-
36
-
37
-
38
-
39
-
40
-
41
-
42
-
43
-
44
-
45
-
46
-
47
-
48
-
49
-
50
-
51
-
52
-
53
-
54
-
55
-
56
-
57
-
58
-
59
-
60
-
61
-
62
-
63
-
64
-
65
-
66
-
67
-
68
-
69
-
70
-
71
-
72
-
73
-
74
-
75
-
76
-
77
-
78
-
79
-
80
-
81
-
82
-
83
-
84
-
85
-
86
-
87
-
88
-
89
-
90
-
91
-
92
-
93
-
94
-
95
-
96
-
97
-
98
-
99
-
100
-
101
-
102
-
103
-
104
-
105
-
106
-
107
-
108
-
109
-
110
-
111
-
112
-
113
-
114
-
115
-
116
-
117
-
118
-
119
-
120
-
121
-
122
-
123
-
124
-
125
-
126
-
127
-
128
-
129
-
130
-
131
-
132
-
133
-
134
-
135
-
136
-
137
-
138
-
139
-
140
-
141
-
142
-
143
-
144
 |
 |