Gateway GT5436E 8511861 - Gateway Computer Hardware Reference for Windows Vist - Page 41
Replacing the system battery - bios
 |
View all Gateway GT5436E manuals
Add to My Manuals
Save this manual to your list of manuals |
Page 41 highlights
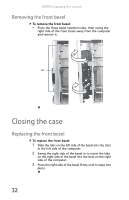
www.gateway.com 5 Align the notches on the new DIMM with the notches on the memory module bank and press the module firmly into the bank. The tabs on the sides of the memory module should secure the memory module automatically. When the module is secure, you hear a click. 6 Replace the side panel by following the instructions in "Replacing the side panel" on page 33. 7 Return your computer to its upright position. 8 Reconnect the cables and the power cord. 9 Turn on your computer. Windows starts and the Windows desktop appears. 10 Click (Start), right-click Computer, then click Properties. The amount of memory in your computer is displayed. Replacing the system battery Warning Danger of explosion if battery is incorrectly replaced. Replace only with the same or equivalent type recommended by the manufacturer. Dispose of used batteries following the manufacturer's instructions. If the computer clock does not keep time or the settings in the BIOS Setup utility are not saved when you turn off your computer, replace the system battery. Use a battery of the same size and voltage as the original battery that was in your computer. To replace the battery: 1 Restart your computer. 2 During the restart, press and hold the F1 key. The main menu of the BIOS Setup utility opens. 3 Write down all the values in the menus and submenus, then exit from the utility. 4 Shut down your computer. 35
-
 1
1 -
2
-
3
-
4
-
5
-
6
-
7
-
8
-
9
-
10
-
11
-
12
-
13
-
14
-
15
-
16
-
17
-
18
-
19
-
20
-
21
-
22
-
23
-
24
-
25
-
26
-
27
-
28
-
29
-
30
-
31
-
32
-
33
-
34
-
35
-
 36
36 -
 37
37 -
 38
38 -
 39
39 -
 40
40 -
 41
41 -
 42
42 -
 43
43 -
 44
44 -
 45
45 -
 46
46 -
47
-
48
-
49
-
50
-
51
-
52
-
53
-
54
-
55
-
56
-
57
-
58
-
59
-
60
-
61
-
62
-
63
-
64
-
65
-
66
-
67
-
68
-
69
-
70
-
71
-
72
-
73
-
74
-
75
-
76
-
77
-
78
-
79
-
80
-
81
-
82
-
83
-
84
-
85
-
86
-
87
-
88
-
89
-
90
-
91
-
92
-
93
-
94
-
95
-
96
-
97
-
98
-
99
-
100
-
101
-
102
-
103
-
104
-
105
-
106
-
107
-
108
-
109
-
110
-
111
-
112
-
113
-
114
-
115
-
116
-
117
-
118
-
119
-
120
-
121
-
122
-
123
-
124
-
125
-
126
-
127
-
128
-
129
-
130
-
131
-
132
-
133
-
134
-
135
-
136
-
137
-
138
 |
 |
