GE 25881EE3 User Guide - Page 11
Answering System Set Up - phone
 |
UPC - 044319502336
View all GE 25881EE3 manuals
Add to My Manuals
Save this manual to your list of manuals |
Page 11 highlights
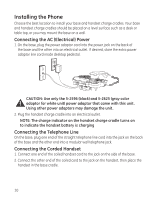
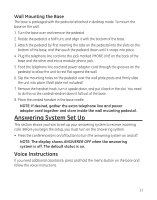
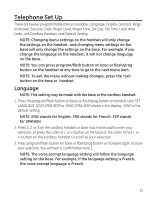
Wall Mounting the Base The base is packaged with the pedestal attached in desktop mode. To mount the base on the wall: 1. Turn the base over and remove the pedestal. 2. Rotate the pedestal a half turn, and align it with the bottom of the base. 3. Attach the pedestal by first inserting the tabs on the pedestal into the slots on the bottom of the base, and then push the pedestal down until it snaps into place. 4. Plug the telephone line cord into the jack marked PHONE LINE on the back of the base and the other end into a modular phone jack. 5. Feed the telephone line cord and power adaptor cord through the grooves on the pedestal to allow the unit to rest flat against the wall. 6. Slip the mounting holes on the pedestal over the wall plate posts and firmly slide the unit into place. (Wall plate not included.) 7. Remove the handset hook, turn it upside down, and put it back in the slot. You need to do this so the corded handset doesn't fall out of the base. 8. Place the corded handset in the base cradle. NOTE: If desired, gather the extra telephone line and power adaptor cord together and store inside the wall mounting pedestal. Answering System Set Up This section shows you how to set up your answering system to receive incoming calls. Before you begin the setup, you must turn on the answering system. • Press the conference/ans on/off button to turn the answering system on and off. NOTE: The display shows ANSWERER OFF when the answering system is off. The default status is on. Voice Instructions If you need additional assistance, press and hold the memo button on the base and follow the voice instructions. 11
-
 1
1 -
2
-
3
-
4
-
5
-
 6
6 -
 7
7 -
 8
8 -
 9
9 -
 10
10 -
 11
11 -
 12
12 -
 13
13 -
 14
14 -
 15
15 -
 16
16 -
17
-
18
-
19
-
20
-
21
-
22
-
23
-
24
-
25
-
26
-
27
-
28
-
29
-
30
-
31
-
32
-
33
-
34
-
35
-
36
-
37
-
38
-
39
-
40
-
41
-
42
-
43
-
44
-
45
-
46
-
47
-
48
-
49
-
50
-
51
-
52
-
53
-
54
-
55
-
56
-
57
-
58
-
59
-
60
-
61
-
62
-
63
-
64
-
65
-
66
-
67
-
68
-
69
-
70
-
71
-
72
-
73
-
74
-
75
-
76
-
77
-
78
-
79
-
80
-
81
-
82
-
83
-
84
-
85
-
86
-
87
-
88
-
89
-
90
-
91
-
92
-
93
-
94
-
95
-
96
 |
 |
