GE 28213EE2 User Guide - Page 12
Installing the Phone - handset
 |
UPC - 044319805017
View all GE 28213EE2 manuals
Add to My Manuals
Save this manual to your list of manuals |
Page 12 highlights
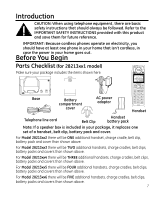
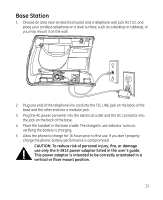
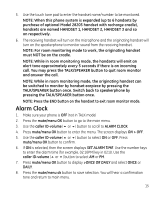
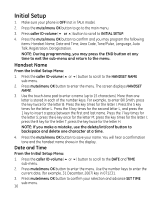
Installing the Phone Installing the Handset Battery NOTE: You must connect the handset battery before use. CAUTION: To reduce the risk of fire or personal injury, use only the Thomson Inc. approved Nickel-metal Hydride battery (Ni-MH) battery model 5-2840, that is compatible with this unit. 1. Locate battery and battery door which are packaged together inside a plastic bag and are separate from the handset. 2. Locate the battery compartment on the back of the handset. 3. Plug the battery pack cord into the jack inside the compartment. NOTE: To ensure proper battery installation, the connector is keyed and can be inserted only one way. 4. Insert the battery pack. 5. Close the battery compartment by pushing the door up until it snaps into place. 12
-
 1
1 -
2
-
3
-
4
-
5
-
6
-
 7
7 -
 8
8 -
 9
9 -
 10
10 -
 11
11 -
 12
12 -
 13
13 -
 14
14 -
 15
15 -
 16
16 -
 17
17 -
18
-
19
-
20
-
21
-
22
-
23
-
24
-
25
-
26
-
27
-
28
-
29
-
30
-
31
-
32
-
33
-
34
-
35
-
36
-
37
-
38
-
39
-
40
-
41
-
42
-
43
-
44
-
45
-
46
-
47
-
48
 |
 |
