GE 28223EE3 User Guide - Page 32
Storing CID Records in Internal Memory, Deleting a CID Record, Deleting All CID Records
 |
UPC - 044319805055
View all GE 28223EE3 manuals
Add to My Manuals
Save this manual to your list of manuals |
Page 32 highlights
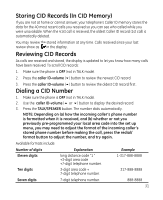
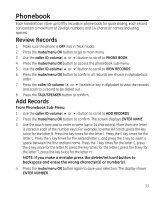
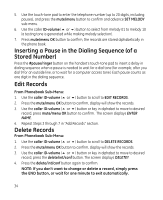
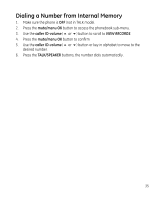
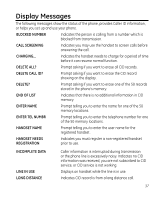
Storing CID Records in Internal Memory You may also store CID information in the phone's internal memory. NOTE: It is important that you format CID records correctly BEFORE storing in internal memory as you cannot reformat CID records stored in memory. 1. Make sure the phone is OFF (not in TALK mode). 2. Use the caller ID-volume (6 or 5) button to scroll to the desired CID record. 3. Press the mute/menu OK button to display ENTER NAME and then follow "ADD RECORDS in Phoneboook section" procedures from Step 3 to Step 7 to store the number. NOTE: Press the END button once to keep the previous setting (making no changes) and return to the menu. NOTE: If the selected CID record contains any information that is non-numeric, the unit will not allow this record to transfer to the internal user memory. The handset will display UNABLE TO STORE. Deleting a CID Record 1. Make sure the phone is OFF (not in TALK mode). 2. Use the caller ID-volume (5 or 6) button to display the CID record you want to delete. 3. Press the delete/int/conf button. The display shows DELETE CALL ID? NOTE: Press the END button to return to the previous screen without deleting any CID records. 4. Press the delete/int/conf button to erase the record showing in the display. The display shows DELETED. Deleting All CID Records 1. Make sure the phone is OFF (not in TALK mode). 2. Use the caller ID-volume (5 or 6) button to display any Caller ID record. 3. Press and hold the delete/int/conf button until the screen displays DELETE ALL?. NOTE: Press the END button to return to the previous screen without deleting any CID records. 4. Press delete/int/conf button to erase all of the current CID records. The display shows DELETED followed by NO CALLS. 32
-
 1
1 -
2
-
3
-
4
-
5
-
6
-
7
-
8
-
9
-
10
-
11
-
12
-
13
-
14
-
15
-
16
-
17
-
18
-
19
-
20
-
21
-
22
-
23
-
24
-
25
-
26
-
 27
27 -
 28
28 -
 29
29 -
 30
30 -
 31
31 -
 32
32 -
 33
33 -
 34
34 -
 35
35 -
 36
36 -
 37
37 -
38
-
39
-
40
-
41
-
42
-
43
-
44
-
45
-
46
-
47
-
48
 |
 |
