GE 60-873-95 Installation Instructions - Page 2
Installation, Testing the ShatterPro
 |
UPC - 046188089840
View all GE 60-873-95 manuals
Add to My Manuals
Save this manual to your list of manuals |
Page 2 highlights
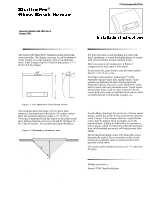
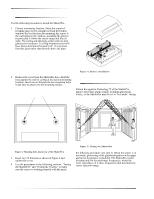
Installation Use the following procedure to install the ShatterPro. 1. Choose a mounting location. Since the sound of breaking glass travels straight out from the broken window, the best location for mounting the sensor is the wall opposite the window--assuming the glass to be protected is within the sensor range and line of sight. The ceiling and adjoining (side) walls are also good sensor locations. A ceiling mounted sensor will have better detection if located 6-10’ (2-3 m) back from the glass rather than directly above the glass. Important ! DO NOT EXCEED THE 20' MAXIMUM DETECTION RANGE OF THE SHATTERPRO. While the sensor may function beyond the 20' range, it could miss a minimum output glassbreak. Furthermore, changing conditions in the room, such as rearranging furniture, could reduce the range of the sensor back to 20'. 2. Remove the cover from the ShatterPro base. Hold the base against the wall or ceiling at the desired mounting location. Insert screws through the two mounting holes in the base to attach it to the mounting surface. Mounting holes 3V Batteries Cover Base Figure 4. Battery installation Testing the ShatterPro Pattern Recognition Technology™ of the ShatterPro ignores most false alarm sounds, including glassbreak testers, so the ShatterPro must be set to “test mode” during Figure 3. Mounting holes (back view of the ShatterPro) 3. Insert two 3V batteries as shown in Figure 4 and replace the cover. 4 Use the procedures in the following sections, “Testing the ShatterPro” and “Testing the System,” to make sure the sensor is working properly with the panel. Figure 5. Testing the ShatterPro the following procedure (see step 2). When the sensor is in test mode, processing of the glassbreak pattern in the upper and lower frequencies is disabled. The ShatterPro is then listening only for the mid-range frequencies, which the tester reproduces. It is these frequencies that determine the sensor detection range. 2
-
 1
1 -
 2
2 -
 3
3 -
 4
4
 |
 |