GE 60-873-95 Installation Instructions - Page 3
Adding the ShatterPro to Panel, Memory, Testing the System - installation
 |
UPC - 046188089840
View all GE 60-873-95 manuals
Add to My Manuals
Save this manual to your list of manuals |
Page 3 highlights
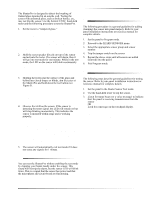
The ShatterPro is designed to detect the breaking of framed glass mounted in an outside wall. Testing the sensor with unframed glass, such as broken bottles, etc., may not trip the sensor. Use the Sentrol 5709C hand-held tester and the following procedure to test the ShatterPro. 1. Set the tester to “tempered glass.” Note The 5709C tester has a different setting for each type of glass. You should always set the tester for tempered or laminated glass (either is correct and both have the same range) unless you are certain that all the glass to be protected is plate glass. 2. Hold the tester speaker directly on top of the sensor and activate the tester. The sensor will alarm, then it will go into test mode for one minute. While in the test mode, the LED on the sensor will blink continuously. Note Extend the test mode time by activating the tester at least once a minute. 3. Holding the tester near the surface of the glass and behind any closed drapes or blinds, aim the tester at the ShatterPro and hold down the test button (see Figure 5). Note Remember, the ShatterPro should not be installed in rooms with lined, insulating, or sound deadening drapes or rooms with closed wooden window shutters inside. 4. Observe the LED on the sensor. If the sensor is detecting the tester signal, the LED will remain on but will stop blinking momentarily. This indicates the sensor is mounted within range and is working properly. Note If the sensor LED blinks continuously when the test button is pressed, the sensor is not detecting the tester signal. Replace the tester battery if you suspect it is not producing a strong signal. If you are certain that the tester signal is strong, reposition the sensor closer to the window and retest. Add more sensors if necessary to achieve complete coverage. 5. The sensor will automatically exit test mode if it does not sense any signals for 1 minute. The "Hand Clap" Test Adding the ShatterPro to Panel Memory The following procedure is a general guideline for adding (learning) the sensor into panel memory. Refer to your panel installation instructions or reference manual for complete details. 1. Set the panel to Program mode. 2. Proceed to the LEARN SENSORS menu. 3. Select the appropriate sensor group and sensor number. 4. Trip the tamper switch on the sensor. 5. Repeat the above steps until all sensors are added (learned) into the panel. 6. Exit Program mode. Testing the System The following steps describe general guidelines for testing the sensor. Refer to your panel installation instructions or reference manual for complete details. 1. Set the panel to the Dealer Sensor Test mode. 2. Use the hand-held tester to trip the sensor. 3. Listen for status beeps (or a voice message) to indicate that the panel is receiving transmissions from the sensor OR Look for a message on the touchpad display. Note Refer to you panel installation instructions for troubleshooting information. You can test the ShatterPro without enabling the test mode by clapping your hands loudly under the sensor. This sound will not trip the alarm, but the sensor LED will blink twice. This is a signal that the sensor has power and that the microphone and circuit board are functioning. 3
-
 1
1 -
 2
2 -
 3
3 -
 4
4
 |
 |