GE CFE29TSDSS Installation Instructions - Page 24
Installing The Refrigerator Cont.
 |
View all GE CFE29TSDSS manuals
Add to My Manuals
Save this manual to your list of manuals |
Page 24 highlights
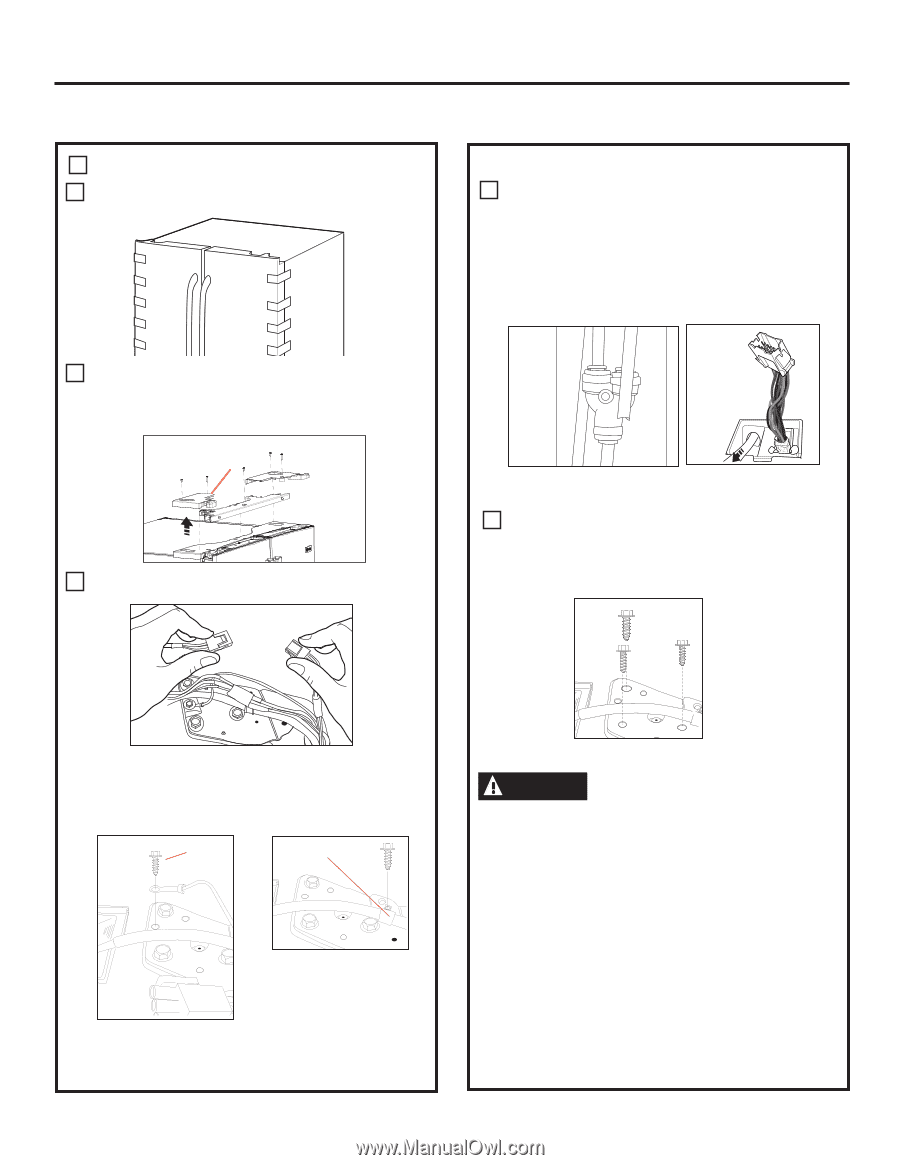
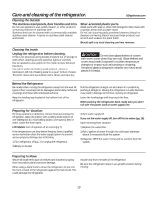
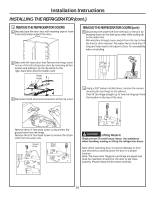
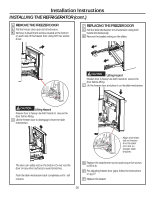
Installation Instructions INSTALLING THE REFRIGERATOR (cont.) 3 REMOVE THE REFRIGERATOR DOORS A Securely tape the door shut with masking tape or have a second person support the door. REMOVE THE REFRIGERATOR DOORS (cont) D Disconnect the water line from the back of the unit by pressing down on the dark grey collar while pulling up on the water line. Pull waterline through case conduit from the top to free the line for door removal. The water line is more than 4' long and may need to be taped to Door for accessibility when reinstalling. B Start with left-hand door first: Remove the hinge cover on top of the left refrigerator door by removing all hex screws and pulling it up. Do the same for the right-hand door and the middle cover. Hinge Cover C Disconnect both electrical connectors at the top cover. E Using a 3/8" socket ratchet/driver, remove the screws securing the top hinge to the cabinet, then lift the hinge straight up to free the hinge pin from the location in the top of the door. Remove the 1/4" hex head screw to disconnect the ground wire from the hinge. Remove the 1/4" hex head screw to remove the strain relief from the water line. Ground screw Strain Relief CAUTION Lifting Hazard. Single person lift could cause injury. Use assistance when handling, moving or lifting the refrigerator doors. Note: when removing door, to prevent damage to door and electronics, carefully place the door in a proper location. Note: The lower door hinge pin and hinge are keyed and must be matched correctly for the door to self close properly. Please follow the directions carefully. 24
-
 1
1 -
2
-
3
-
4
-
5
-
6
-
7
-
8
-
9
-
10
-
11
-
12
-
13
-
14
-
15
-
16
-
17
-
18
-
 19
19 -
 20
20 -
 21
21 -
 22
22 -
 23
23 -
 24
24 -
 25
25 -
 26
26 -
 27
27 -
 28
28 -
 29
29 -
30
-
31
-
32
-
33
-
34
-
35
-
36
-
37
-
38
-
39
-
40
-
41
-
42
-
43
-
44
-
45
-
46
-
47
-
48
 |
 |