GE DIGIA209-160 User Manual - Page 11
Back panel - firmware
 |
UPC - 046188132263
View all GE DIGIA209-160 manuals
Add to My Manuals
Save this manual to your list of manuals |
Page 11 highlights
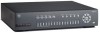
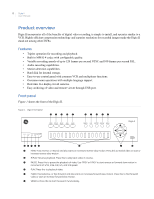
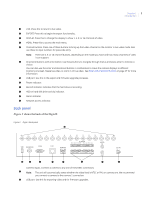
Chapter 1 3 Introduction G LIVE. Press this to return to live video. H EXPORT. Press this to begin the export functionality. I DISPLAY. Press this to change the display to show 1, 4, 9, or 16 channels of video. J MENU. Press this to access the main menu. K Channel buttons. Press one of these buttons to bring up that video channel on the monitor in live video mode. Also use these to input numbers for passcode entry. Note: There are 4, 9, or 16 channel buttons, depending on the model you have and how many channels of video it can support. L Directional buttons with enter button. Use these buttons to navigate through menus and press enter to indicate a choice. You can also use the enter and directional buttons in combination to move the camera displays to different locations onscreen, freeze live video, or zoom in on live video. See Enter and directional buttons on page 27 for more information. M USB port. Use this in the export and firmware upgrade processes. N Power indicator. O Record indicator. Indicates that the hard drive is recording. P HDD or hard disk drive activity indicator. Q Alarm indicator. R Network access indicator. Back panel Figure 2 shows the back of the Digia II. Figure 2. Digia II back panel A 1 2 3 4 5 6 7 8 9 10 11 12 13 14 15 16 USB MAIN MONITOR SVGA ALARM IN 9 C 10 C 11 C 12 C 13 C 14 C 15 C 16 C LAN ALARM OUT NC C NO 1C2C 3C4C 5C6C 7C 8C AUDIO IN OUT DC19V + - BC D E F G H I Camera inputs. Connect a camera to any one of these BNC connectors. A Note: The unit will automatically sense whether the video feed is NTSC or PAL on camera one. We recommend you connect a camera to the camera 1 connection. B USB port. Use this for exporting video and for firmware upgrades.
-
 1
1 -
2
-
3
-
4
-
5
-
 6
6 -
 7
7 -
 8
8 -
 9
9 -
 10
10 -
 11
11 -
 12
12 -
 13
13 -
 14
14 -
 15
15 -
 16
16 -
17
-
18
-
19
-
20
-
21
-
22
-
23
-
24
-
25
-
26
-
27
-
28
-
29
-
30
-
31
-
32
-
33
-
34
-
35
-
36
-
37
-
38
-
39
-
40
-
41
-
42
-
43
-
44
-
45
-
46
 |
 |
