GE GFE24JSKSS Use and Care Manual - Page 19
Installing The Refrigerator
 |
View all GE GFE24JSKSS manuals
Add to My Manuals
Save this manual to your list of manuals |
Page 19 highlights
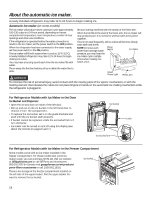
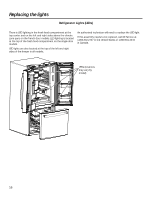
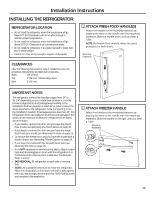
Installation Instructions INSTALLING THE REFRIGERATOR REFRIGERATOR LOCATION • Do not install the refrigerator where the temperature will go below 60°F (16°C) because it will not run often enough to maintain proper temperatures. • Do not install the refrigerator where the temperature will go above 100°F (37°C) because it will not perform properly. • Do not install the refrigerator in a location exposed to water (rain, etc.) or direct sunlight. • Install it on a floor strong enough to support it fully loaded. 1 ATTACH FRESH FOOD HANDLE(S) Attach the handle to the mounting fasteners by aligning the slots on the handle with the mounting fasteners. Slide the handle down until you hear a "click". NOTE: For French Door models, follow the same procedure for both doors. Mounting Fasteners CLEARANCES Allow the following clearances for ease of installation, proper air circulation and plumbing and electrical connections. Sides 1/8" (3 mm) Top 1" (25 mm) Cabinet/Hinge Cover Back 2" (50 mm) IMPORTANT NOTES This refrigerator without the handles ranges from 34" to 35-1/4" depending on your model (see dimension G on the previous page). Doors and passageways leading to the installation location must be at least 36" in order to leave the doors attached to the refrigerator while transporting it into the installation location. If passageways are less than 36", the refrigerator doors can easily be scratched and damaged. The doors can be removed to allow the refrigerator to be safely moved indoors. • If you need to remove the door and you have the french door model, see Removing the French Doors on page 20. • If you need to remove the door and you have the single fresh food door model, see Reversing the Door on page 26. • To remove the freezer door and you have the model with a freezer drawer see Removing Freezer Drawer on page 24. • If you have the model with the hinged freezer door see Reversing the Door on page 26. • If it is NOT necessary to remove doors, skip to Step 6. Leave tape and all packaging on doors until the refrigerator is in the final location. Once in place, install door handles (see Steps 1 and 2). • SKID REMOVAL: Tilt refrigerator to each side to remove skid. • NOTE: Use a padded hand truck to move this refrigerator. Place the refrigerator on the hand truck with a side against the truck. We strongly recommend that TWO PEOPLE move and complete this installation. 2 ATTACH FREEZER HANDLE Attach the handle to the mounting fasteners by aligning the slots on the handle with the mounting fasteners. Slide the handle to the right until you hear a "click". Mounting Fasteners 19
-
 1
1 -
2
-
3
-
4
-
5
-
6
-
7
-
8
-
9
-
10
-
11
-
12
-
13
-
 14
14 -
 15
15 -
 16
16 -
 17
17 -
 18
18 -
 19
19 -
 20
20 -
 21
21 -
 22
22 -
 23
23 -
 24
24 -
25
-
26
-
27
-
28
-
29
-
30
-
31
-
32
-
33
-
34
-
35
-
36
-
37
-
38
-
39
-
40
-
41
-
42
-
43
-
44
-
45
-
46
-
47
-
48
-
49
-
50
-
51
-
52
-
53
-
54
-
55
-
56
-
57
-
58
-
59
-
60
-
61
-
62
-
63
-
64
-
65
-
66
-
67
-
68
-
69
-
70
-
71
-
72
-
73
-
74
-
75
-
76
-
77
-
78
-
79
-
80
-
81
-
82
-
83
-
84
-
85
-
86
-
87
-
88
-
89
-
90
-
91
-
92
-
93
-
94
-
95
-
96
-
97
-
98
-
99
-
100
-
101
-
102
-
103
-
104
-
105
-
106
-
107
-
108
-
109
-
110
-
111
-
112
-
113
-
114
-
115
-
116
-
117
-
118
-
119
-
120
-
121
-
122
-
123
-
124
-
125
-
126
-
127
-
128
-
129
-
130
-
131
-
132
 |
 |