GE GLDT696TSS Installation Instructions - Page 10
Step 13 - Connect Drain Line
 |
UPC - 084691211785
View all GE GLDT696TSS manuals
Add to My Manuals
Save this manual to your list of manuals |
Page 10 highlights
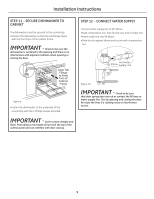
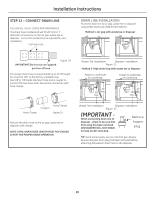
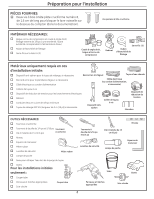
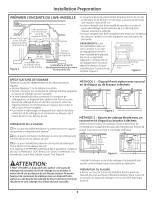
Installation Instructions STEP 13 - CONNECT DRAIN LINE FOLLOW ALL LOCAL CODES AND ORDINANCES. The drain hose molded end will fit 5/8",3/4"or 1" diameter connections on the air gap, waste tee or disposer . Cut on the marked line as required for your installation. CuttCinugttLiningesLines DRAIN LINE INSTALLATION •Connect drain line to air gap, waste tee or disposer using either previously determined method. Method 1- Air gap with waste tee or disposer 1" 3/4" 5/8" Figure 20 IMPOIMRTPAONRTTA:DNoT:nDotocnuottccourtrcuograrutgeadted popr otirotinonofohf hoossee •If a longer drain hose is required,add up to 42"off length for a total of 10ft. to the factory installed hose. Use 5/8"or 7/8"inside diameter hose and a coupler to connect the two hose ends. Secure the connection with hose clamps. Waste Tee Installation Disposer Installation Figure 22 Method 2- High drain loop with waste tee or disposer Fasten to underside of countertop Fasten to underside of countertop 32" 18" Min. 18" Min. Min. CCoouupler HoHsoeseClCalammpp Hose Clamp Figure 21 •Secure the drain hose to the air gap, waste tee or disposer with clamps. NOTE: TOTAL DRAIN HOSE LENGTH MUST NOT EXCEED 10 FEET FOR PROPER DRAIN OPERATION. Waste Tee Installation Disposer Installation Figure 23 IMPORTANT - When connecting drain line to disposer , check to be sure that drain plug has been removed. DISHWASHER WILL NOT DRAIN IF PLUG IS LEFT IN PLACE. RhRHeoemopmpopopveveerer pPlulugg TIP: Avoid unnecessary service call char ges. Always be sure disposer drain plug has been removed before attaching dishwasher drain hose to the disposer . 10
-
 1
1 -
2
-
3
-
4
-
 5
5 -
 6
6 -
 7
7 -
 8
8 -
 9
9 -
 10
10 -
 11
11 -
 12
12 -
 13
13 -
 14
14 -
 15
15 -
16
-
17
-
18
-
19
-
20
-
21
-
22
-
23
-
24
 |
 |
