GE GTL18JCPBS Use and Care Manual - Page 21
Troubleshooting Tips, Problem, Possible Causes, What To
 |
UPC - 084691089643
View all GE GTL18JCPBS manuals
Add to My Manuals
Save this manual to your list of manuals |
Page 21 highlights
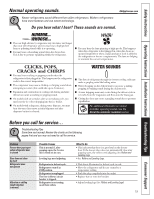
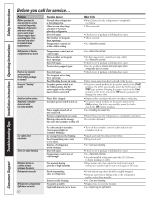
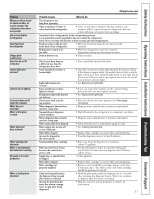
Problem Moisture collects inside (in humid weather, air carries moisture into refrigerator when doors are opened) Hot air from bottom of refrigerator Food freezing in the refrigerator Orange glow in the freezer Door bins do not fit in the door Freezer light does not work Controls do not light up Ice bucket does not fit under the icemaker Water has poor taste/odor Water in first glass is warm Water dispenser does not work Water spurting from dispenser Water is not dispensed but icemaker is working No water or ice cube production Water is leaking from dispenser GEAppliances.com Possible Causes What To Do Too frequent or too long door openings. Open containers of water or warm food in the refrigerator. • Cover or seal open containers. During a defrost cycle, moisture will be removed from the refrigerator, but may return with long or frequent door openings. Normal air flow cooling motor. In the refrigeration process, it is normal that heat be expelled in the area under the refrigerator. Some floor coverings will discolor at these normal and safe temperatures. Food too close to the air vent at the back of the refrigerator. • Move the food away from the air vent (near the controls). Refrigerator control is set too cold. • Move the refrigerator control to a warmer temperature setting one increment at a time. Defrost heater is on. • This is normal. The freezer door bins are a different size than the refrigerator door bins. Some models do not have a freezer light. Light bulb burned out or loose. Some models do not have lighted controls. Refrigerator light bulb burned out or loose. The freezer shelf is in the top position. Water dispenser has not been used for a long time. Normal when refrigerator is first installed. Water dispenser has not been used for a long time. Water system has been drained. Water supply line turned off or not connected. Water filter clogged. Air may be trapped in the water system. Newly-installed filter cartridge. Water in reservoir is frozen because the controls are set too cold. Supply line or shutoff valve is clogged. Water filter clogged. Filter cartridge not properly installed. Glass not being held under the dispenser long enough after button is released. Air may be present in the water line system, causing water to drip after being dispensed. • Try to install the bins in both doors. • Check for a semi-clear dome light shield in the freezer ceiling. If the dome is opaque white, the model does not have a freezer light. Check for a door activated light switch on the right side of the freezer. If there is only a cap in place of a switch, the model does not have a freezer light. • See Replacing the light bulbs. • If you can read white numbers on the control setting, the model does not have lighted controls. • See Replacing the light bulbs. • Place the shelf in the lower position. See Rearranging the shelves. • Dispense water until all water in system is replenished. • Wait 24 hours for the refrigerator to completely cool down. • Dispense water until all water is system is replenished. • Allow several hours for replenished supply to chill. • See Installing the water line. • Replace filter cartridge or remove filter and install plug. • Press the dispenser arm for at least 2 minutes. • Run water from the dispenser for 3 minutes (about 11⁄2 gallons). • Set the refrigerator control to a warmer setting and wait 24 hours. If water does not dispense after 24 hours, call for service. • Call a plumber. • Replace filter cartridge or remove filter and install plug. • Remove and reinstall filter cartridge, being certain that it locks into place. The blade on the end of the cartridge should be positioned vertically. • Hold the glass underneath the dispenser for 2-3 seconds after releasing the dispenser button. Water may continue to dispense after the button is released. • Dispense water for at least 2 minutes to remove air from system. 21 Safety Instructions Operating Instructions Installation Instructions Troubleshooting Tips Consumer Support
-
 1
1 -
2
-
3
-
4
-
5
-
6
-
7
-
8
-
9
-
10
-
11
-
12
-
13
-
14
-
15
-
 16
16 -
 17
17 -
 18
18 -
 19
19 -
 20
20 -
 21
21 -
 22
22 -
 23
23 -
 24
24 -
 25
25 -
 26
26 -
27
-
28
-
29
-
30
-
31
-
32
-
33
-
34
-
35
-
36
-
37
-
38
-
39
-
40
-
41
-
42
-
43
-
44
-
45
-
46
-
47
-
48
-
49
-
50
-
51
-
52
-
53
-
54
-
55
-
56
-
57
-
58
-
59
-
60
-
61
-
62
-
63
-
64
-
65
-
66
-
67
-
68
-
69
-
70
-
71
-
72
-
73
-
74
-
75
-
76
-
77
-
78
-
79
-
80
 |
 |