GE GTS18IBRCC Use and Care Manual - Page 17
Transfer Freezer Door, Handle To The Right, Transfer Refrigerator Door, Plastic Handle
 |
UPC - 084691165347
View all GE GTS18IBRCC manuals
Add to My Manuals
Save this manual to your list of manuals |
Page 17 highlights
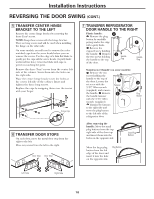
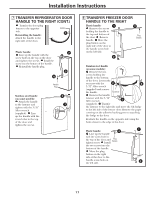
Installation Instructions 7 TRANSFER REFRIGERATOR DOOR HANDLE TO THE RIGHT (CONT.) Transfer the door plug button to the opposite side. Reinstalling the handle: Attach the handle to the right side of the door. Button 1 Plastic handle: 2 Line up the handle with the screw holes in the top of the door and tighten the screws. Install the screw into the bottom of the handle. Reinstall the handle plug. 3 4 Handle Plug Stainless steel handle 2 (on some models): Attach the handle to the fastener and 1 tighten with the 3/32″ Allen wrench (supplied). Line up the handle with the screw holes in the top of the door and tighten the screws. 8 TRANSFER FREEZER DOOR HANDLE TO THE RIGHT Plastic handle: 1 Remove the screws holding the handle to the top and bottom of the door. Remove handle. Move the plug button on the right side of the door to the handle screw hole on the left side. 3 Plug Button 2 Stainless steel handle (on some models): Remove the two screws holding the handle to the bottom of the door. Loosen the set screw with the 2 3 3/32″ Allen wrench (supplied) and remove the handle. Fastener Remove the handle fastener with the 3/16″ Allen wrench 1 (supplied). Transfer the fastener to the right side and move the GE badge to the left side of the freezer door. Remove the paper covering on the adhesive backing prior to attaching the badge to the door. Reattach the handle on the opposite side using the holes closest to the edge of the door. 1 Plastic handle: 3 Line up the handle with the screw hole in the top of the door and tighten screw. Install Plug Button the two screws into the bottom of the handle. Move the plug button on the right side of the door to the handle screw hole on 2 the left side. 17
-
 1
1 -
2
-
3
-
4
-
5
-
6
-
7
-
8
-
9
-
10
-
11
-
 12
12 -
 13
13 -
 14
14 -
 15
15 -
 16
16 -
 17
17 -
 18
18 -
 19
19 -
 20
20 -
 21
21 -
 22
22 -
23
-
24
-
25
-
26
-
27
-
28
-
29
-
30
-
31
-
32
-
33
-
34
-
35
-
36
-
37
-
38
-
39
-
40
-
41
-
42
-
43
-
44
-
45
-
46
-
47
-
48
-
49
-
50
-
51
-
52
-
53
-
54
-
55
-
56
-
57
-
58
-
59
-
60
-
61
-
62
-
63
-
64
-
65
-
66
-
67
-
68
-
69
-
70
-
71
-
72
-
73
-
74
-
75
-
76
-
77
-
78
-
79
-
80
 |
 |
