GE JB700DNWW Use and Care Manual - Page 20
Energy Saver Mode, Adjust the Oven Thermostat
 |
UPC - 084691179412
View all GE JB700DNWW manuals
Add to My Manuals
Save this manual to your list of manuals |
Page 20 highlights
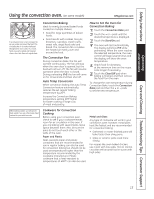
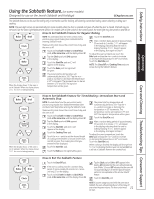
Safety Instructions Operating Instructions Special features of your oven control. Energy Saver Mode To save energy, you can turn off the time of day clock and the display when the range is not in use. Press and hold the + and - pads at the same time to enable or disable this feature. This will turn the display on or off. NOTE: The display will remain off after a power outage. Your new touch pad control has additional features that you may choose to use. The following are the features and how you may activate them. The special feature modes can only be activated while the display is showing the time of day. They remain in the control's memory until the steps are repeated. When the display shows your choice, touch the Start/On pad. The special features will remain in memory after a power failure. NOTE: The Sabbath feature and the Thermostat Adjustment feature are also Special Features, but they are addressed separately in the following sections. Bake + Broil Temp Recall Hi/Lo Clock Start On 12 Hour Shutoff With this feature, should you forget and leave the oven on, the control will automatically turn off the oven after 12 hours during baking functions or after 3 hours during a broil function. If you wish to turn OFF this feature, follow the steps below. Touch the Bake and Broil Hi/Lo pads at the same time until the display shows SF. Touch the Clock pad. The display will show ON (12 hour shutoff). Touch the Clock pad repeatedly until the display shows OFF (no shutoff). Touch the Start/On pad to activate the no shut-off and leave the control set in this special features mode. Consumer Support Troubleshooting Tips Care and Cleaning Adjust the oven thermostat-Do it yourself! You may find that your new oven cooks differently than the one it replaced. Use your new oven for a few weeks to become more familiar with it. If you still think your new oven is too hot or too cold, you can adjust the thermostat yourself. Do not use thermometers, such as those found in grocery stores, to check the temperature setting of your oven. These thermometers may vary 20-40 degrees. NOTE: This adjustment will not affect the broiling or the self-cleaning temperatures. The adjustment will be retained in memory after a power failure. To Adjust the Thermostat Bake + Broil Temp Recall Hi/Lo Bake Temp Recall Start On 20 Touch the Bake and Broil Hi/Lo pads at the same time until the display shows SF. Touch the Bake pad. A two-digit number shows in the display. The oven temperature can be adjusted up to (+) 35°F hotter or (-) 35°F cooler. Touch the + pad to increase the temperature in 1-degree increments. Touch the - pad to decrease the temperature in 1-degree increments. When you have made the adjustment, touch the Start/On pad to go back to the time of day display. Use your oven as you would normally. NOTE: This adjustment will not affect the broiling or self-cleaning temperatures. It will be retained in memory after a power failure.
-
 1
1 -
2
-
3
-
4
-
5
-
6
-
7
-
8
-
9
-
10
-
11
-
12
-
13
-
14
-
 15
15 -
 16
16 -
 17
17 -
 18
18 -
 19
19 -
 20
20 -
 21
21 -
 22
22 -
 23
23 -
 24
24 -
 25
25 -
26
-
27
-
28
-
29
-
30
-
31
-
32
-
33
-
34
-
35
-
36
-
37
-
38
-
39
-
40
 |
 |
