GE JT965SKSS Installation Instructions - Page 8
Securing the Oven in the Opening
 |
View all GE JT965SKSS manuals
Add to My Manuals
Save this manual to your list of manuals |
Page 8 highlights
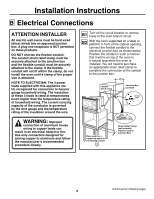
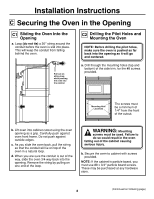
Installation Instructions C Securing the Oven in the Opening C1 Sliding the Oven Into the Opening a. Loop (do not tie) a 36" string around the conduit before the oven is slid into place. This will keep the conduit from falling behind the oven. Pull out on string loop while pushing the oven into the cabinet C2 Drilling the Pilot Holes and Mounting the Oven NOTE: Before drilling the pilot holes, make sure the oven is pushed as far back into the opening as it will go and centered. a. Drill through the mounting holes (top and bottom) of the side trim, for the #8 screws provided. Mounting Hole Locations The screws must be a minimum of 1/4" from the front of the cutout. b. Lift oven into cabinet cutout using the oven opening as a grip. Carefully push against oven front frame. Do not push against outside edges. c. As you slide the oven back, pull the string so that the conduit will lie on top of the oven in a natural loop. d. When you are sure the conduit is out of the way, slide the oven 3/4 way back into the opening. Remove the string by pulling on one end of the loop. WARNING: Mounting screws must be used. Failure to do so could result in the oven falling out of the cabinet causing serious injury. b. Secure the oven to cabinet with screws provided. NOTE: If the cabinet is particle board, you must use #8 x 3/4" particle board screws. These may be purchased at any hardware store. 8 (Continued on following page)
-
 1
1 -
2
-
 3
3 -
 4
4 -
 5
5 -
 6
6 -
 7
7 -
 8
8 -
 9
9 -
 10
10 -
 11
11 -
 12
12
 |
 |
