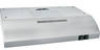
GE JV348LSS Use and Care Manual - Page 8
Damage - Shipment/installation, Parts Included, Mounting Space, Tools You Will Need
 |
UPC - 084691143710
View all GE JV348LSS manuals
Add to My Manuals
Save this manual to your list of manuals |
Page 8 highlights
Installation Instructions DAMAGE - SHIPMENT/INSTALLATION • If the unit is damaged in shipment, return the unit to the store in which it was bought for repair or replacement. • If the unit is damaged by the customer, repair or replacement is the responsibility of the customer. • If the unit is damaged by the installer (if other than the customer), repair or replacement must be made by arrangement between customer and installer. MOUNTING SPACE 24″, 30″ or 36″ match cooktop to width 30″ min. Bottom edge of cabinet needs to be 30″ or more from the cooking surface TOOLS YOU WILL NEED Flat-blade and Phillips screwdrivers Pencil Duct tape Saw (saber or keyhole) Electric drill Metal snips (in some applications) 1/4″ pivoting hex socket Pliers Tape measure Wire stripper Flashlight Caulking Level 1/4″ Nutdriver 66″ or more from the floor to the top of the hood NOTES: • Hood width may be greater than the width of the range or cooktop, but it may not be smaller. • Ensure the range or cooktop is installed per manufacturer's installation instructions. • If you are going to vent your range hood to the outside, see the "Ducting Requirements" section for exhaust duct preparation. PARTS INCLUDED PART Grease Filter only (JV338) QUANTITY 1 Charcoal Filter only 1 (JN327 and RN328) Grease Filter and Charcoal Filter 2 (JV24X, JV347, JV348 and JV367) Mounting Screws 4 (8 - 18″ x 3/4″ Phillips pan head) Exhaust Adaptor 1 (for 31⁄4″ x 10″ rect. venting) Exhaust Adaptor Screw 1 (8 - 18″ x 3/8″ Phillips pan head or hex head) 8
-
 1
1 -
2
-
 3
3 -
 4
4 -
 5
5 -
 6
6 -
 7
7 -
 8
8 -
 9
9 -
 10
10 -
 11
11 -
 12
12 -
 13
13 -
14
-
15
-
16
 |
 |
