GE JX2127SH Installation Instructions - Page 3
Install The Anti-tip Bracket - installation instructions
 |
UPC - 084691082859
View all GE JX2127SH manuals
Add to My Manuals
Save this manual to your list of manuals |
Page 3 highlights
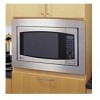
Installation Instructions 3 INSTALL THE ANTI-TIP BRACKET A Draw a line on the cutout floor at the center of the cutout, and extend the line 1⁄2″ down the face of the cabinet. B Fold or cut the front edge of the template, along the front guide line. Place the template flush along the front edge of the cutout floor, aligning the center line of the template with the center line of the cutout floor. Mark the centers of the two screw holes with an awl or center punch for the anti-tip bracket location as shown. Cutout Floor C Remove the template and drill two holes for the anti-tip bracket. Screws 4 INSTALL MICROWAVE OVEN INTO CABINET A Slide the microwave oven part way into the cabinet opening. B Plug in the microwave oven. Bottom Duct Anti-Tip Assembly Anti-Tip Bracket Bottom Bracket C The bottom bracket must be flat to the cutout floor to engage correctly with the anti-tip bracket as shown. Carefully slide the microwave oven back, engaging the anti-tip bracket. Make sure the power cord is not mashed or cut as you slide the microwave into place. D Center the microwave oven within the cutout opening. E Ensure the microwave oven is accurately centered. Line up the center line on the cabinet with the triangular hole on the front of the bottom duct. Anti-Tip Bracket D Install the anti-tip bracket onto the cutout floor using two bronze round-head screws. Cutout Opening Screws Positioning Flange F Drill pilot holes through the positioning flange and then install five bronze round-head screws at the front of the bottom duct as shown. 3
-
 1
1 -
 2
2 -
 3
3 -
 4
4
 |
 |
