GE PGCS1RKZSS Use and Care Manual - Page 26
Installation Instructions, REMOVING THE FREEZER DRAWER
 |
UPC - 084691085461
View all GE PGCS1RKZSS manuals
Add to My Manuals
Save this manual to your list of manuals |
Page 26 highlights
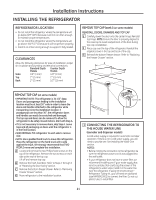
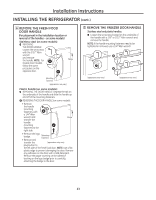
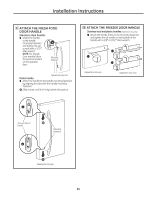
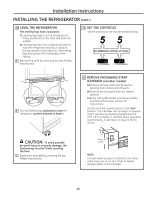
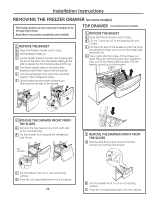
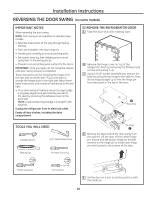
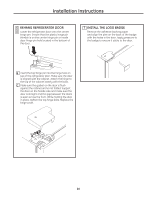
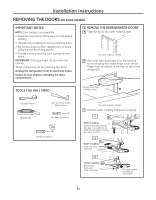
Installation Instructions REMOVING THE FREEZER DRAWER (on some models) The freezer drawer can be removed, if needed, to fit through tight areas. Read these instructions completely and carefully. 1 REMOVE THE BASKET A Open the freezer drawer until it stops. B Lift the freezer caddy up. C Pull the divider forward until the rear locating tabs are out of the slots. Turn the divider slightly to the side to release the front locating tabs and lift out. D The freezer basket rests on the metal slide brackets and is held in place with swing locks. E Turn the swing locks from vertical to horizontal position. Open refrigerator doors. F Lift the basket up and rotate it toward you. Slide out from the side of the drawer. TOP DRAWER (on Double Drawer Models) 1 REMOVE THE BASKET A Open the freezer drawer until it stops. B Cut the 2 wire ties off of the basket with wire cutters. C Lift the front end of the basket so that the front two alignment tabs come out of the metal slide brackets first. D Then rotate the front edge of the drawer up while lifting the remaining two rear alignment tabs out of the metal slide brackets. Pull the basket up and out of the drawer. A 2 REMOVE THE DRAWER FRONT FROM THE SLIDES A Remove the hex-head screw from each side of the rail assembly. B Tilt the drawer front toward the refrigerator and lift out. Rail assembly Screw C Set the drawer front on a non-scratching surface. D Push the rail assemblies back into the cabinet. 26 2 REMOVE THE DRAWER FRONT FROM THE SLIDES A Remove the 8 hex head screws from the drawer and remove the drawer. B Set the drawer front on a non-scratching surface. C Push the rail assemblies back into the cabinet.
-
 1
1 -
2
-
3
-
4
-
5
-
6
-
7
-
8
-
9
-
10
-
11
-
12
-
13
-
14
-
15
-
16
-
17
-
18
-
19
-
20
-
 21
21 -
 22
22 -
 23
23 -
 24
24 -
 25
25 -
 26
26 -
 27
27 -
 28
28 -
 29
29 -
 30
30 -
 31
31 -
32
-
33
-
34
-
35
-
36
-
37
-
38
-
39
-
40
-
41
-
42
-
43
-
44
-
45
-
46
-
47
-
48
-
49
-
50
-
51
-
52
-
53
-
54
-
55
-
56
-
57
-
58
-
59
-
60
-
61
-
62
-
63
-
64
-
65
-
66
-
67
-
68
-
69
-
70
-
71
-
72
-
73
-
74
-
75
-
76
-
77
-
78
-
79
-
80
-
81
-
82
-
83
-
84
-
85
-
86
-
87
-
88
-
89
-
90
-
91
-
92
-
93
-
94
-
95
-
96
-
97
-
98
-
99
-
100
-
101
-
102
-
103
-
104
-
105
-
106
-
107
-
108
-
109
-
110
-
111
-
112
-
113
-
114
-
115
-
116
-
117
-
118
-
119
-
120
-
121
-
122
-
123
-
124
-
125
-
126
-
127
-
128
-
129
-
130
-
131
-
132
-
133
-
134
-
135
-
136
 |
 |
