GE SCA1000 Installation Instructions - Page 14
Adjust the Exhaust Adaptor, Connecting Ductwork, continued - sca1001
 |
View all GE SCA1000 manuals
Add to My Manuals
Save this manual to your list of manuals |
Page 14 highlights
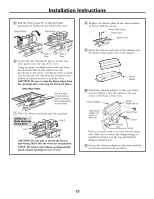
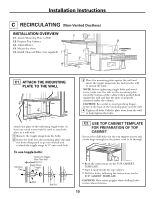
Installation Instructions A4. MOUNT THE OVEN (continued) Cabinet Front Cabinet Bottom Shelf Filler Block Equivalent to Depth of Cabinet Recess Self-Aligning Screw Oven Top 4 Attach the oven to the top cabinet. 5 Insert 2 self-aligning screws (1⁄4″-28 x 31⁄4″) through outer top cabinet holes. Turn two full turns on each screw. A5. ADJUST THE EXHAUST ADAPTOR Open the top cabinet and adjust the exhaust adaptor to connect to the house duct. Damper Back of Oven A6. CONNECTING DUCTWORK House Duct 6 Tighten center screw completely. NOTE: Use self-aligning screw, 1⁄4″-28 x 25⁄8″, on JVM1790 and self-aligning screws, 1⁄4″-28 x 31⁄4″, on JVM1490, SCA1000, and SCA1001. 7 Tighten the outer two screws to the top of the oven. (While tightening screws, hold the oven in place against the wall and the top cabinet.) 1 Extend the house duct down to connect to the exhaust adaptor. 2 Seal exhaust duct joints using duct tape. 8 Install grease filters. See the Owner's Manual packed with the oven. 14
-
 1
1 -
2
-
3
-
4
-
5
-
6
-
7
-
8
-
 9
9 -
 10
10 -
 11
11 -
 12
12 -
 13
13 -
 14
14 -
 15
15 -
 16
16 -
 17
17 -
 18
18 -
 19
19 -
20
-
21
-
22
-
23
-
24
-
25
-
26
-
27
-
28
-
29
-
30
-
31
-
32
-
33
-
34
-
35
-
36
-
37
-
38
-
39
-
40
-
41
-
42
-
43
-
44
-
45
-
46
-
47
-
48
 |
 |
