GE zgu384nsmss Installation Instructions - Page 10
GE zgu384nsmss - 30" SS GAS COOKTOP NG Manual
 |
UPC - 084691143154
View all GE zgu384nsmss manuals
Add to My Manuals
Save this manual to your list of manuals |
Page 10 highlights
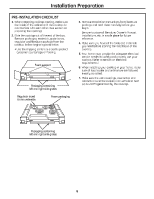
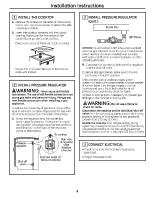
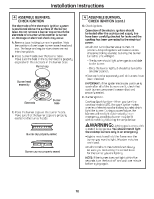
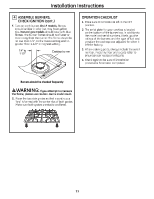
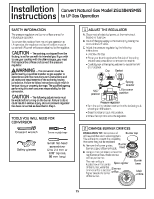
Installation Instructions 4 ASSEMBLE BURNERS, CHECK IGNITION The electrode of the electronic ignition system is positioned above the surface of the burner base. Do not remove a burner cap or touch the electrode of a burner while another is turned on. Damage or electrical shock may occur. A. Remove tape holding burners in position. Note the position of one larger burner base, head and cap. The large and regular size pieces are not interchangeable. B. Place burner heads over the burner base. Make sure the hole in the burner head is properly aligned with the electrode in the burner base. Burner cap 4 ASSEMBLE BURNERS, CHECK IGNITION (cont.) D. Check igniters. Operation of the electric igniters should be tested after the cooktop and supply line have been carefully checked for leaks and the cooktop has been connected to the electrical power. • Push and turn a burner valve to the LITE position. All spark igniters will make a series of sparks (ticking sounds), but only the burner turned to LITE will light. - The burner should light when gas is available to the burner. - Once the burner lights, it should be turned to another position. • Test each valve separately until all burners have been checked. Burner head assembly IMPORTANT: If the igniter electrodes continue to spark after all of the burners are lit, check that each burner component is assembled and properly seated. E. Burner ignition. Burner base Cooktop Spark Ignition-When you turn the cooktop knob to LITE, the spark igniter makes a series of electric sparks (ticking sounds) which light the burner. During a power failure, the burners will not light automatically. In an emergency, a cooktop burner may be lit with a match by following the steps below. Lighting gas burners with a match is dangerous. You should match light the cooktop burners only in an emergency. • Light a match and hold the flame near the burner you want to light. Wooden matches work best. • Push in and turn the control knob slowly. Be sure you are turning the correct knob for the burner you are lighting. NOTE: If the burner does not light within five seconds, turn the knob off and wait one minute before trying again. Electrode C. Place the burner caps on the burner heads. Make sure that the burner caps are properly seated on the burner heads. WARNING: Burner cap properly seated Burner cap not properly seated 10
-
 1
1 -
2
-
3
-
4
-
 5
5 -
 6
6 -
 7
7 -
 8
8 -
 9
9 -
 10
10 -
 11
11 -
 12
12 -
 13
13 -
 14
14 -
 15
15 -
16
-
17
-
18
-
19
-
20
-
21
-
22
-
23
-
24
-
25
-
26
-
27
-
28
-
29
-
30
-
31
-
32
-
33
-
34
-
35
-
36
 |
 |
