Gigabyte GA-8S648FX-775 Manual - Page 64
<2> Manual Create
 |
View all Gigabyte GA-8S648FX-775 manuals
Add to My Manuals
Save this manual to your list of manuals |
Page 64 highlights
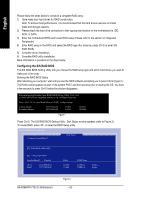
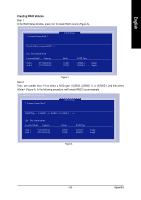
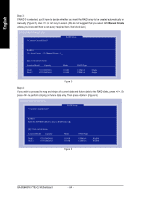
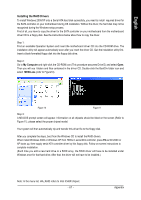
English Step 3: If RAID 0 is selected, you'll have to decide whether you want the RAID array to be created automatically or manually (Figure 5). Use or key to select. (We do not suggest that you select Manual Create unless you know well how to set every required item, like block size.) SiS RAID BIOS Setting Utility * Current Created Raid * RAID Setup RAID 0 Auto Create Manual Create : 1 [Q] : Exit current menu LocationModel Capacity Disk 1 Disk 2 ST3120026AS ST3120026AS Mode 111GB 111GB RAID Type UDMA 6 UDMA 6 Single Single Figure 5 Step 4: If you wish to proceed to map and stripe all current data and future data to the RAID disks, press . Or press to perform striping on future data only. Then press (Figure 6). SiS RAID BIOS Setting Utility * Current Created Raid * RAID Setup RAID 0 Split the SOURCE (Disk 1) data to RAID disks? N [Q] : Exit current menu LocationModel Capacity Disk 1 Disk 2 ST3120026AS ST3120026AS Mode 111GB 111GB RAID Type UDMA 6 UDMA 6 RAID0 RAID0 Figure 6 GA-8S648FX-775(-C) Motherboard - 64 -
-
 1
1 -
2
-
3
-
4
-
5
-
6
-
7
-
8
-
9
-
10
-
11
-
12
-
13
-
14
-
15
-
16
-
17
-
18
-
19
-
20
-
21
-
22
-
23
-
24
-
25
-
26
-
27
-
28
-
29
-
30
-
31
-
32
-
33
-
34
-
35
-
36
-
37
-
38
-
39
-
40
-
41
-
42
-
43
-
44
-
45
-
46
-
47
-
48
-
49
-
50
-
51
-
52
-
53
-
54
-
55
-
56
-
57
-
58
-
 59
59 -
 60
60 -
 61
61 -
 62
62 -
 63
63 -
 64
64 -
 65
65 -
 66
66 -
 67
67 -
 68
68 -
 69
69 -
70
-
71
-
72
-
73
-
74
-
75
-
76
-
77
-
78
-
79
-
80
 |
 |
