Gigabyte GA-945PLM-DS2 Manual - Page 63
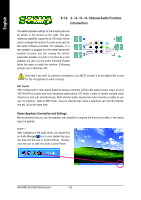
Setting Up 4-Channel Audio
 |
View all Gigabyte GA-945PLM-DS2 manuals
Add to My Manuals
Save this manual to your list of manuals |
Page 63 highlights
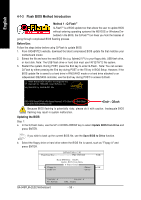
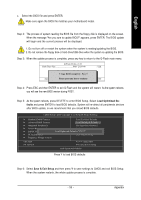
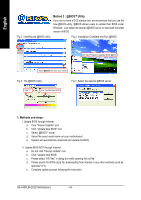
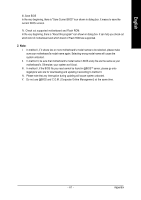
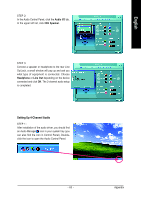
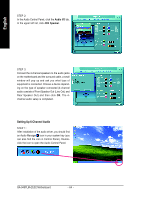
English STEP 2: In the Audio Control Panel, click the Audio I/O tab. In the upper left list, click 2CH Speaker. STEP 3: Connect a speaker or headphone to the rear Line Out jack, a small window will pop up and ask you what type of equipment is connected. Choose Headphone or Line Out depending on the device connected and click OK. The 2-channel audio setup is completed. Setting Up 4-Channel Audio STEP 1 : After installation of the audio driver, you should find an Audio Manager icon in your system tray (you can also find the icon in Control Panel). Doubleclick the icon to open the Audio Control Panel. - 63 - Appendix
-
 1
1 -
2
-
3
-
4
-
5
-
6
-
7
-
8
-
9
-
10
-
11
-
12
-
13
-
14
-
15
-
16
-
17
-
18
-
19
-
20
-
21
-
22
-
23
-
24
-
25
-
26
-
27
-
28
-
29
-
30
-
31
-
32
-
33
-
34
-
35
-
36
-
37
-
38
-
39
-
40
-
41
-
42
-
43
-
44
-
45
-
46
-
47
-
48
-
49
-
50
-
51
-
52
-
53
-
54
-
55
-
56
-
57
-
 58
58 -
 59
59 -
 60
60 -
 61
61 -
 62
62 -
 63
63 -
 64
64 -
 65
65 -
 66
66 -
 67
67 -
 68
68 -
69
-
70
-
71
-
72
 |
 |

Appendix
- 63 -
English
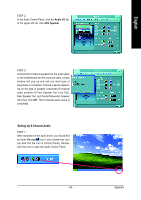
STEP 3:
Connect a speaker or headphone to the rear Line
Out jack, a small window will pop up and ask you
what type of equipment is connected. Choose
Headphone
or
Line Out
depending on the device
connected and click
OK
. The 2-channel audio setup
is completed.
STEP 2:
In the Audio Control Panel, click the
Audio I/O
tab.
In the upper left list, click
2CH Speaker
.
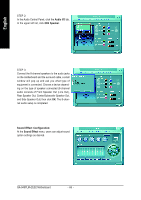
Setting Up 4-Channel Audio
STEP 1 :
After installation of the audio driver, you should find
an Audio Manager
icon in your system tray (you
can also find the icon in Control Panel). Double-
click the icon to open the Audio Control Panel.