Gigabyte GA-965P-S3 Manual - Page 32
The Main Menu Example BIOS Ver.: GA-965P-DS3, F10a - ds3 reset bios
 |
View all Gigabyte GA-965P-S3 manuals
Add to My Manuals
Save this manual to your list of manuals |
Page 32 highlights
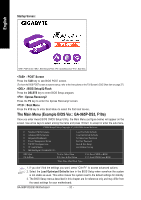
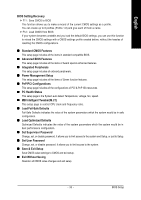
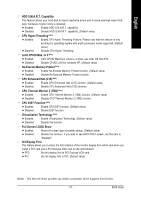
Startup Screen: English : POST Screen : BIOS Setup/Q-Flash : XpressRecovery2 : Boot Menu : POST Screen Press the TAB key to see BIOS POST screen. (To show the BIOS POST screen at system startup, refer to the instructions on the Full Screen LOGO Show item on page 37.) : BIOS Setup/Q-Flash Press the DELETE key to enter BIOS Setup program. : Xpress Recovery2 Press the F9 key to enter the Xpress Recovery2 screen. : Boot Menu Press the F12 key to enter Boot Menu to select the first boot device. The Main Menu (Example BIOS Ver.: GA-965P-DS3, F10a) Once you enter Award BIOS CMOS Setup Utility, the Main Menu (as figure below) will appear on the screen. Use arrow keys to select among the items and press to accept or enter the sub-menu. CMOS Setup Utility-Copyright (C) 1984-2006 Award Software Standard CMOS Features Advanced BIOS Features Integrated Peripherals Power Management Setup PnP/PCI Configurations PC Health Status MB Intelligent Tweaker(M.I.T.) Load Fail-Safe Defaults Load Optimized Defaults Set Supervisor Password Set User Password Save & Exit Setup Exit Without Saving ESC: Quit F8: Q-Flash : Select Item F10: Save & Exit Setup F11: Save CMOS to BIOS F12: Load CMOS from BIOS Time, Date, Hard Disk Type... 1. If you don't find the settings you want, press "Ctrl+F1" to access advanced options. 2. Select the Load Optimized Defaults item in the BIOS Setup when somehow the system is not stable as usual. This action makes the system reset to the default settings for stability. 3. The BIOS Setup menus described in this chapter are for reference only and may differ from the exact settings for your motherboard. GA-965P-DS3/S3 Motherboard - 32 -
-
 1
1 -
2
-
3
-
4
-
5
-
6
-
7
-
8
-
9
-
10
-
11
-
12
-
13
-
14
-
15
-
16
-
17
-
18
-
19
-
20
-
21
-
22
-
23
-
24
-
25
-
26
-
 27
27 -
 28
28 -
 29
29 -
 30
30 -
 31
31 -
 32
32 -
 33
33 -
 34
34 -
 35
35 -
 36
36 -
 37
37 -
38
-
39
-
40
-
41
-
42
-
43
-
44
-
45
-
46
-
47
-
48
-
49
-
50
-
51
-
52
-
53
-
54
-
55
-
56
-
57
-
58
-
59
-
60
-
61
-
62
-
63
-
64
-
65
-
66
-
67
-
68
-
69
-
70
-
71
-
72
-
73
-
74
-
75
-
76
-
77
-
78
-
79
-
80
-
81
-
82
-
83
-
84
-
85
-
86
-
87
-
88
 |
 |