Gigabyte GA-F2A58M-H User Manual - Page 32
Drivers Installation, Menu.exe, BootDrv, hseries RAID for XP 32bit system <A88>
 |
View all Gigabyte GA-F2A58M-H manuals
Add to My Manuals
Save this manual to your list of manuals |
Page 32 highlights
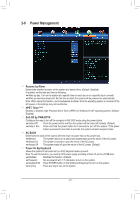
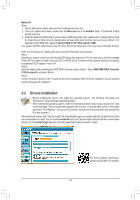
Method B: Steps: 1: Use an alternative system and insert the motherboard driver disk. 2: From your optical drive folder, double click the Menu.exe file in the BootDrv folder. A Command Prompt window will open. 3: Insert the blank formatted disk (if you're using a USB floppy disk drive, make sure it is designated as drive A). Select the controller driver by pressing the corresponding letter from the menu and press . For example, for the AMD A58, select 7) hseries RAID for XP 32bit system . Your system will then automatically copy the driver files to the floppy disk. Press any key to exit when finished. Refer to the following for installing the driver during the Windows setup process. Step 1: Restart your system to boot from the Windows XP setup disk and press as soon as you see the message "Press F6 if you need to install a 3rd party SCSI or RAID driver." A screen will then appear asking you to specify an additional SCSI adapter. Press . Step 2: Insert the floppy disk containing the SATA RAID driver and press . Select AMD AMD-RAID Controller 32 Bit [scsiport] and press . Step 3: On the next screen, press to continue the driver installation. After the driver installation, you can proceed with the Windows XP installation. 3-2 Drivers Installation •• Before installing the drivers, first install the operating system. (The following instructions use Windows 8.1 as the example operating system.) •• After installing the operating system, insert the motherboard driver disk into your optical drive. Click on the message "Tap to choose what happens with this disc" on the top-right corner of the screen and select "Run Run.exe." (Or go to My Computer, double-click the optical drive and execute the Run.exe program.) After inserting the driver disk, "Xpress Install" will automatically scan your system and then list all the drivers that are recommended to install. You can click the Install All button and "Xpress Install" will install all the recommended drivers. Or click Install Single Items to manually select the drivers you wish to install. For more software information, please visit GIGABYTE's website. - 32 -
-
 1
1 -
2
-
3
-
4
-
5
-
6
-
7
-
8
-
9
-
10
-
11
-
12
-
13
-
14
-
15
-
16
-
17
-
18
-
19
-
20
-
21
-
22
-
23
-
24
-
25
-
26
-
 27
27 -
 28
28 -
 29
29 -
 30
30 -
 31
31 -
 32
32 -
 33
33 -
 34
34
 |
 |