Gigabyte GA-Z270M-D3H Users Manual - Page 38
Drivers Installation, Installing the SATA RAID/AHCI Driver and Operating System
 |
View all Gigabyte GA-Z270M-D3H manuals
Add to My Manuals
Save this manual to your list of manuals |
Page 38 highlights
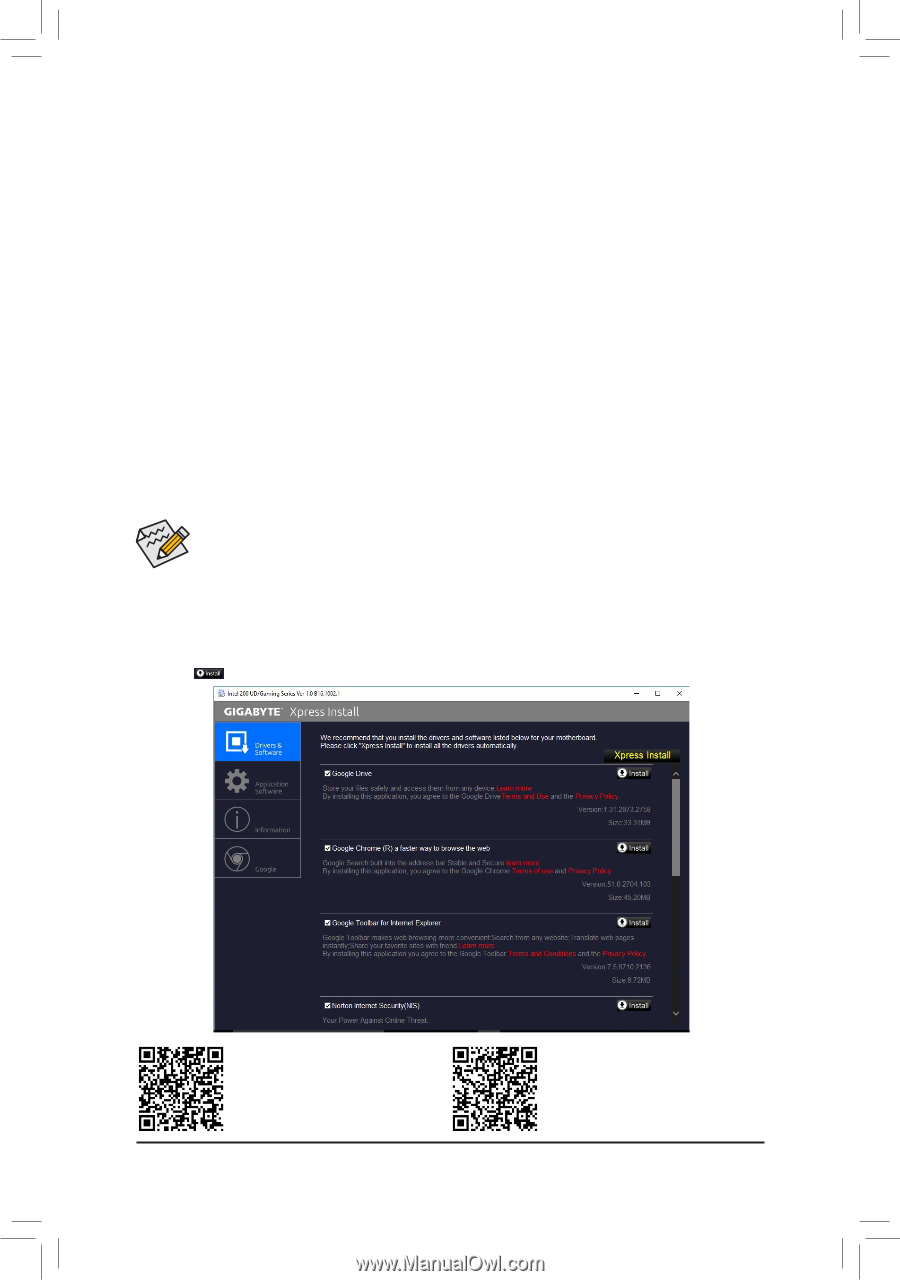
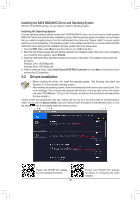
Installing the SATA RAID/AHCI Driver and Operating System With the correct BIOS settings, you are ready to install the operating system. Installing the Operating System As some operating systems already include Intel® SATA RAID/AHCI driver, you do not need to install separate RAID/AHCI driver during the Windows installation process. After the operating system is installed, we recommend that you install all required drivers from the motherboard driver disk using "Xpress Install" to ensure system performance and compatibility. If the operating system to be installed requires that you provide additional SATA RAID/AHCI driver during the OS installation process, please refer to the steps below: 1. Copy the IRST folder under \Boot in the driver disk to your USB thumb drive. 2. Boot from the Windows setup disk and perform standard OS installation steps. When the screen requesting you to load the driver appears, select Browse. 3. Insert the USB thumb drive and then browse to the location of the driver. The locations of the drivers are as follows: Windows 32-bit: \iRST\f6flpy-x86 Windows 64-bit: \iRST\f6flpy-x64 4. When a screen as shown, select Intel Chipset SATA RAID Controller and click Next to load the driver and continue the OS installation. 3-2 Drivers Installation •• Before installing the drivers, first install the operating system. (The following instructions use Windows 10 as the example operating system.) •• After installing the operating system, insert the motherboard driver disk into your optical drive. Click on the message "Tap to choose what happens with this disc" on the top-right corner of the screen and select "Run Run.exe." (Or go to My Computer, double-click the optical drive and execute the Run.exe program.) "Xpress Install" will automatically scan your system and then list all of the drivers that are recommended to install. You can click the Xpress Install button and "Xpress Install" will install all of the selected drivers. Or click the arrow icon to individually install the drivers you need. Please visit GIGABYTE's website for more software information. - 38 - Please visit GIGABYTE's website for details on configuring the audio software.
-
 1
1 -
2
-
3
-
4
-
5
-
6
-
7
-
8
-
9
-
10
-
11
-
12
-
13
-
14
-
15
-
16
-
17
-
18
-
19
-
20
-
21
-
22
-
23
-
24
-
25
-
26
-
27
-
28
-
29
-
30
-
31
-
32
-
 33
33 -
 34
34 -
 35
35 -
 36
36 -
 37
37 -
 38
38 -
 39
39 -
 40
40 -
 41
41 -
 42
42 -
 43
43 -
44
 |
 |