Gigabyte GS-R12P4S Manual - Page 16
Installing the Heat Sink
 |
View all Gigabyte GS-R12P4S manuals
Add to My Manuals
Save this manual to your list of manuals |
Page 16 highlights
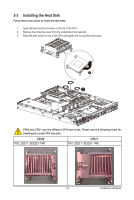
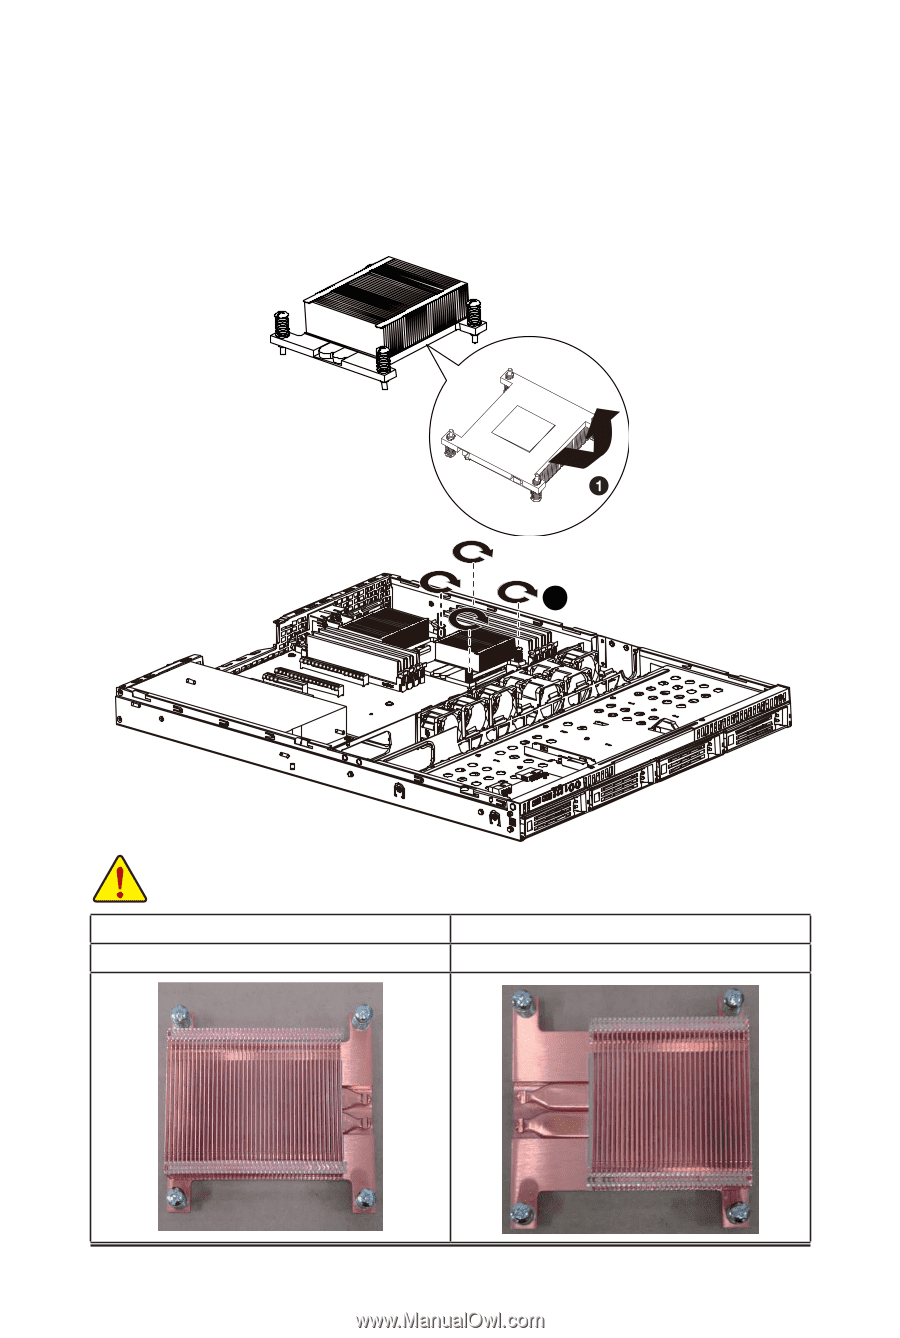
2-3 Installing the Heat Sink Follow these instructions to install the heat sinks: 1. Apply thermal compound evenly on the top of the CPU. 2. Remove the protective cover from the underside of the heat sink. 3. Place the heat sink(s) on top of the CPU and tighten the four positioning screws. 2 CPU0 and CPU1 use the different CPU heat sinks. Please see the following table for installing the correct CPU heat sink. CPU0 P/N: 25ST1-363200-T4R CPU1 P/N: 25ST1-363201-T4R - 16 - Hardware Installation
-
 1
1 -
2
-
3
-
4
-
5
-
6
-
7
-
8
-
9
-
10
-
 11
11 -
 12
12 -
 13
13 -
 14
14 -
 15
15 -
 16
16 -
 17
17 -
 18
18 -
 19
19 -
 20
20 -
 21
21 -
22
-
23
-
24
-
25
-
26
-
27
-
28
-
29
-
30
-
31
-
32
-
33
-
34
-
35
-
36
-
37
-
38
-
39
-
40
-
41
-
42
-
43
-
44
-
45
-
46
-
47
-
48
-
49
-
50
-
51
-
52
-
53
-
54
-
55
-
56
-
57
-
58
-
59
-
60
-
61
-
62
-
63
-
64
-
65
-
66
-
67
-
68
-
69
-
70
-
71
 |
 |
- 16 -
Hardware Installation
Follow these instructions to install the heat sinks:
1.
Apply thermal compound evenly on the top of the CPU.
2.
Remove the protective cover from the underside of the heat sink.
3.
Place the heat sink(s) on top of the CPU and tighten the four positioning screws.
2-3
Installing the Heat Sink
2
CPU0
CPU1
P/N: 25ST1-363200-T4R
P/N: 25ST1-363201-T4R
CPU0 and CPU1 use the different CPU heat sinks. Please see the following table for
installing the correct CPU heat sink.