Gigabyte GV-NX86S256H Manual - Page 34
Appendix
 |
UPC - 818313101815
View all Gigabyte GV-NX86S256H manuals
Add to My Manuals
Save this manual to your list of manuals |
Page 34 highlights
English 5. Appendix 5.1. Reflash BIOS in MS-DOS Mode 1. Extract the downloaded Zip file to your hard disk(s) or floppy disk. This procedure assumes drive A. 2. Restart the computer in MS-DOS mode. (For Windows® 2000/XP, you need a startup disk to restart the computer in MS-DOS mode.) 3. Change the command prompt to A:\>. 4. To back up the current BIOS, at the A:\> prompt, type[BIOS flash utility name] -s [BIOS file name] (example: gvf18 -s X86S2H.f1) and press Enter. 5. To flash BIOS, at the A:\> prompt, type [BIOS flash utility name] -p [BIOS file name] (example: gvf18 -p X86S2H.f2) and press Enter. 6. Wait until it's done, then restart your computer. GV-NX86S256H Graphics Accelerator - 32 -
-
 1
1 -
2
-
3
-
4
-
5
-
6
-
7
-
8
-
9
-
10
-
11
-
12
-
13
-
14
-
15
-
16
-
17
-
18
-
19
-
20
-
21
-
22
-
23
-
24
-
25
-
26
-
27
-
28
-
 29
29 -
 30
30 -
 31
31 -
 32
32 -
 33
33 -
 34
34 -
 35
35 -
 36
36
 |
 |

GV-NX86S256H Graphics Accelerator
- 32 -
English
5. Appendix
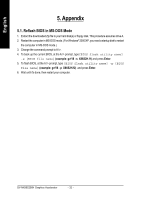
5.1. Reflash BIOS in MS-DOS Mode
1.
Extract the downloaded Zip file to your hard disk(s) or floppy disk. This procedure assumes drive A.
2.
Restart the computer in MS-DOS mode. (For Windows
®
2000/XP, you need a startup disk to restart
the computer in MS-DOS mode.)
3.
Change the command prompt to A:\>.
4.
To back up the current BIOS, at the A:\> prompt, type
[BIOS flash utility name]
-s [BIOS file name]
(example: gvf18
-s
X86S2H.f1)
and press
Enter
.
5.
To flash BIOS, at the A:\> prompt, type
[BIOS flash utility name] -p [BIOS
file name]
(example: gvf18
-p
X86S2H.f2)
and press
Enter
.
6.
Wait until it's done, then restart your computer.