Gigabyte Q2432A Manual - Page 14
Top View
 |
View all Gigabyte Q2432A manuals
Add to My Manuals
Save this manual to your list of manuals |
Page 14 highlights
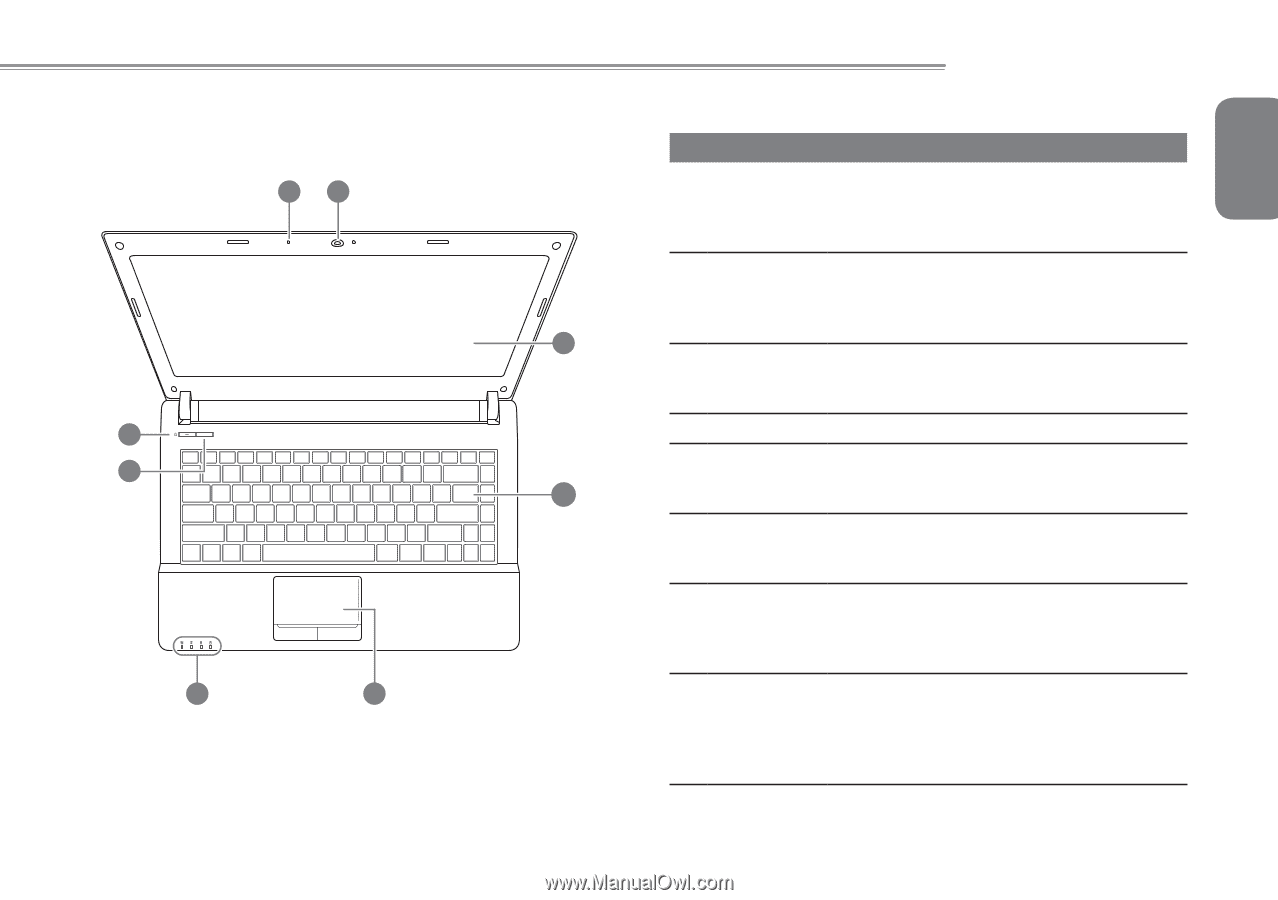
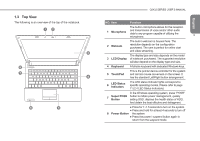
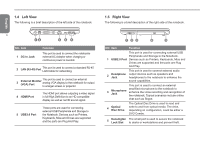
1.3 Top View The following is an overview of the top of the notebook. 12 3 8 POSH 7 4 6 5 Q2432 SERIES USER'S MANUAL NO. Item Function The built-in microphone allows for the reception 1 Microphone and transmission of voice and/or other audio data to any program capable of utilizing the microphone. 3 2 Webcam The built-in webcam is housed here. The resolution depends on the configuration purchased. The cam is perfect for online chat and video streaming. The display type and size depends on the model 3 LCD Display of notebook purchased. The supported resolution will also depend on the display type and size. 4 Keyboard A full-size keyboard with dedicated Windows keys. 5 TouchPad This is the pointer device controller for the system and mimics mouse movement on the screen. It has the standard Left/Right button arrangement. 6 LED Status Indicators The LED status indicator lights correspond to specific operating modes. Please refer to page 11 (2.4 LED Status Indicators) In the Windows operating system, press "POSH" 7 Super POSH Button button to initiate power management, quickly setting OSD, displays the health status of HDD, And obtain the best effective and defragment. ● Press for 1~1.5 seconds to turn on the system. ● Press and hold for at least 4 seconds to turn off 8 Power Button the system. ● Press the power / suspend button again to return from the suspend mode. English
-
 1
1 -
2
-
3
-
4
-
5
-
6
-
7
-
8
-
 9
9 -
 10
10 -
 11
11 -
 12
12 -
 13
13 -
 14
14 -
 15
15 -
 16
16 -
 17
17 -
 18
18 -
 19
19 -
20
-
21
-
22
-
23
-
24
-
25
-
26
-
27
-
28
-
29
-
30
-
31
-
32
-
33
-
34
-
35
-
36
-
37
-
38
-
39
-
40
 |
 |