Graco 2797VIB3 Instruction Manual
Graco 2797VIB3 - Digital Deluxe Video iMonitor Manual
 |
UPC - 047406096824
View all Graco 2797VIB3 manuals
Add to My Manuals
Save this manual to your list of manuals |
Graco 2797VIB3 manual content summary:
- Graco 2797VIB3 | Instruction Manual - Page 1
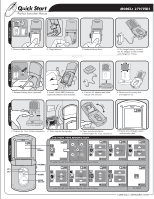
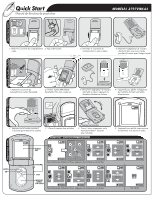
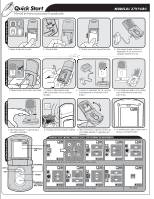
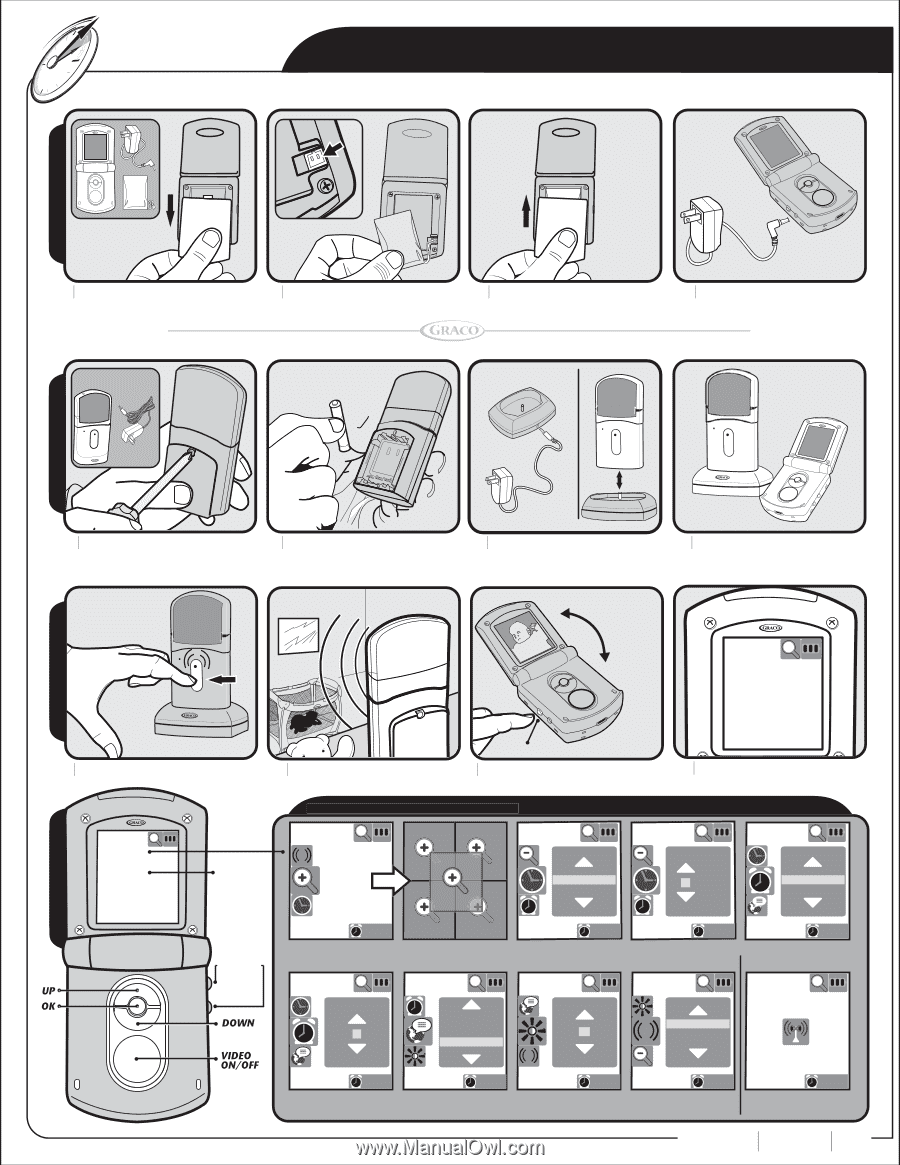
Quick Start Product Instruction Manual R R MODEL# 2797VIB3 R Parent Unit Nursery Unit Activating Units 1 Remove battery door. 2 Plug battery in. 3 Replace battery door. 4 To charge battery, connect the AC adapter to the monitor and charge for 3 hours. R R R 1 Remove battery door (optional - Graco 2797VIB3 | Instruction Manual - Page 2
Placer la caméra face au bébé. Appuyer sur le bouton 3 Ouvrir l'écran et appuyer sur le bouton pendant 1 seconde pour l'allumer. ÉCRAN DEL : GUIDE DE RÉFÉRENCE RAPIDE 4 L'appareil pour adulte commencera à rechercher et à activer la vidéo. Appareil pour adulte HAUT ÉCRAN DEL 12 Hour(am/pm) 24 - Graco 2797VIB3 | Instruction Manual - Page 3
Manual de instrucciones para la producción R MODELO# 2797VIB3 R Unidad para padres 1 Saque la tapa de las pilas. 2 Ponga la pila. 3 Vuelva a poner la tapa de las pilas. 4 Para cargar la pila, conecte el adaptador de CA al monitor mirando al bebé. 3 Abra el monitor y oprima el botón de encendido - Graco 2797VIB3 | Instruction Manual - Page 4
R R OWNER'S MANUAL Keep Instructions For Future Reference ©2008 Graco ISPM024BA 3/08 - Graco 2797VIB3 | Instruction Manual - Page 5
to Parents and Other Users Failure to follow these warnings and the assembly instructions could result in serious injury or death. This device is designed to aid in the monitoring of your child. When using the monitor, you must still provide the supervision necessary for the continued safety of your - Graco 2797VIB3 | Instruction Manual - Page 6
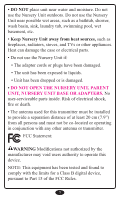
to liquids. • Unit has been dropped or is damaged. • DO NOT OPEN THE NURSERY UNIT, PARENT UNIT, NURSERY UNIT BASE OR ADAPTERS. No user-serviceable parts inside. Risk of electrical shock, fire or death. • The antenna used for this transmitter must be installed to provide a separation distance of at - Graco 2797VIB3 | Instruction Manual - Page 7
installation. This equipment generates, uses and can radiate radio frequency energy and, if not installed and used in accordance with the instructions, may cause harmful interference to radio communications. However, there is no guarantee that interference will not occur in a particular installation - Graco 2797VIB3 | Instruction Manual - Page 8
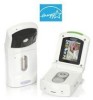
required. Tool required: Phillips screwdriver R Digital Color Video Baby Monitor Quick Start Product Instruction Manual Parent Unit (A6402) OWNER'S MANUAL Keep instructions for future use. Quick Start Manual Parent Unit Battery R Nursery Unit (A6403) (1) AC Adapter (1) AC Adapter Nursery - Graco 2797VIB3 | Instruction Manual - Page 9
Parent Unit CONNECTION LIGHT (pg13) ANTENNA VOLUME UP (pg24) VOLUME DOWN (pg24) SOUND LIGHTS LCD SCREEN UP(pg15) DOWN (pg15) POWER ON/OFF (pg13) AC ADAPTER JACK (pg8) BATTERY LEVEL LIGHT (pg25) OK (pg15) VIDEO ON/OFF (pg14) SPEAKER CHARGING STATUS LIGHT (pg26) BATTERY(pg7) 6 - Graco 2797VIB3 | Instruction Manual - Page 10
Installing Batteries 1 The battery must be plugged into the Parent Unit before the unit will be ready for use. Remove the battery door cover on the Parent Unit by sliding it down. 2 Plug battery into the slot shown in #2. 3 Place battery pack into recess and press wire into the slot. 7 - Graco 2797VIB3 | Instruction Manual - Page 11
4 Replace the battery door. 5 R Attach the AC Adapter to the unit and plug into wall to charge the battery. Charge battery for 3 hours. R NOTE: Make sure to use the adapter with the "L" shaped end, as shown. 8 - Graco 2797VIB3 | Instruction Manual - Page 12
Nursery Unit VIDEO CAMERA MICROPHONE BATTERIES (pg10) POWER LIGHT (pg26) ON/OFF (pg12) R AC ADAPTER JACK (pg11) 9 - Graco 2797VIB3 | Instruction Manual - Page 13
: Screw should be loosened but stay attached to battery door. 7 (Optional) Insert 3 AAA (LR03) batteries. Make sure they are inserted correctly. ● Batteries can be useful in the case of a power outage. ● Batteries should be replaced periodically. ● Batteries should only be used in case of emergency - Graco 2797VIB3 | Instruction Manual - Page 14
Attaching Nursery Unit Base 8 Attach the AC Adapter to the back of the nursery unit base and plug into wall. NOTE: Make sure to use the adapter with the straight shaped end, as shown. 9 Mount nursery unit onto base to operate. 11 - Graco 2797VIB3 | Instruction Manual - Page 15
Nursery Unit Power On/Off 10 Depress button for 1 sec. to turn camera on. R 11 R To change camera angle, swivel the nursery unit top in the desired direction. Please note that camera cannot swivel completely around. 12 - Graco 2797VIB3 | Instruction Manual - Page 16
Parent Unit Power On/Off 12 R Press and hold Power On/Off button for 1 second. Unit will cycle through intro and begin searching for the Nursery Unit. Connection Light 13 R Make sure Nursery Unit is turned on. The live video feed will then be shown. The Connection Light at the top of the unit - Graco 2797VIB3 | Instruction Manual - Page 17
14 R Press and hold Power On/Off button for 1 second to turn unit off. 15 R To activate or deactivate the live video feed, press the Video button. Pressing the Video button will allow the user to view the image from the Nursery Unit. 14 - Graco 2797VIB3 | Instruction Manual - Page 18
16 R To set up preferences, press the "OK" button. 17 R To cycle through the different choices, press up or down. 18 R After choosing one of the options, press the "OK" button to make the selection. NOTE: Once you make a selection (OK), the unit will automatically advance you to the next - Graco 2797VIB3 | Instruction Manual - Page 19
one of the 5 positions 9:22pm Use UP/DOWN to choose, OK to select 21 The Zoom icon will appear at the top the status screen. Monitor will return to the live video feed if available. 9:22pm 16 - Graco 2797VIB3 | Instruction Manual - Page 20
Zoom Out 22 Press OK to open Menu. Press Up/Down to choose Zoom out icon. Press OK to select it. 9:22pm Use UP/DOWN to choose, OK to select 23 Monitor will return to live video screen if available. Zoom icon will not be visible on the status screen. 9:22pm 17 - Graco 2797VIB3 | Instruction Manual - Page 21
select. 12 Hour(am/pm) 24 Hour 9:22pm 26 Press Up/Down to adjust the first digit. Press OK to move to the next digit. Monitor will 07 :32 pm return to the live feed after adjusting all digits. 9:22pm 18 - Graco 2797VIB3 | Instruction Manual - Page 22
, OK to select. Alarm On Alarm Off 9:22pm 29 Press Up/Down to adjust the first digit. Press OK to move to the next digit. Monitor will 07:22 PM return to the live feed after adjusting all digits. 9:22pm 19 - Graco 2797VIB3 | Instruction Manual - Page 23
30 31 R Alarm Clock icon will appear on the bottom of the screen, next to the time. NOTE: If Alarm Clock icon is not visible, it has not been activated. 9:22pm To silence Alarm, press any button. NOTE: Alarm will chime every day at the pre-selected time until Alarm is deactivated, new time is - Graco 2797VIB3 | Instruction Manual - Page 24
Brightness 32 Press "OK" to open Menu. Press Up/Down to choose Brightness icon. Press "OK" to select it. 9:22pm 33 Press Up/Down to choose brightness value, OK to select. (10 levels in all) 10 Monitor will return to the live feed after adjusting all digits. 9:22pm 21 - Graco 2797VIB3 | Instruction Manual - Page 25
Language 34 Press "OK" to open Menu. Press Up/Down to choose Language icon. Press "OK" to select it. 9:22pm 35 Press Up/Down to choose, OK to select. English Français Espanol 9:22pm Monitor will return to the live feed after selecting a language. 22 - Graco 2797VIB3 | Instruction Manual - Page 26
Vibration 36 Press "OK" to open Menu. Press Up/Down to choose Vibration icon. Press "OK" to select it. 9:22pm 37 Press Up/Down to choose, OK to select. Vibe on Vibe off 9:22pm When "Vibe On" is selected, Parent Unit will vibrate when it is activated with sounds from the Child Unit. 23 - Graco 2797VIB3 | Instruction Manual - Page 27
Volume Up/Down 38 VOLUME UP VOLUME DOWN • Press the Volume up or Down button to change the Volume. 24 - Graco 2797VIB3 | Instruction Manual - Page 28
Icon shows how much power is left in the batteries: 39 LOW FULL The Battery icon will cycle while batteries are charging. • When the batteries are low, the Battery Icon will blink and the monitor will beep once every minute. • When the batteries are extremely low, the screen will display the - Graco 2797VIB3 | Instruction Manual - Page 29
in case AC power is lost. • When the Nursery Unit is on battery power, only the audio will be transmitted. This helps to extend the battery life. • The Power Light is green when the batteries are good, red when the batteries are low. • The Parent Unit will show "Nursery Unit AC Power Disconnected - Graco 2797VIB3 | Instruction Manual - Page 30
Accessories/ Wall Mount & Belt Clip Attach wall mount to wall 40 using a #6 screw and drywall anchor (not included). Make sure all cords are not within child's reach. Make sure there is an electrical outlet readily available to plug in the AC adapter. DO NOT use an extension cord. 41 - Graco 2797VIB3 | Instruction Manual - Page 31
Trouble Shooting Most problems have a simple solution. First, check that: • Power is turned ON for both units • Both units are plugged in (or batteries are Check that the battery is properly installed and plugged into connector. No Sound or No Video • Batteries dead or weak - replace or use AC - Graco 2797VIB3 | Instruction Manual - Page 32
Weak Sound, Static or Poor Video. • Nursery Unit too far from baby - move closer. • Parent Unit too far from Nursery Unit - move them closer. • Large objects blocking the signal - try repositioning Nursery Unit. • Volume setting too low - - Graco 2797VIB3 | Instruction Manual - Page 33
Pairing the Parent Unit and Child Unit To ensure privacy, your Parent Unit is paired with your Nursery Unit at the factory. Your Parent Unit will not work with any other Nursery Units. If your Parent Unit won't lock onto your Nursery Unit, or you purchased a new Parent Unit or Nursery Unit, follow - Graco 2797VIB3 | Instruction Manual - Page 34
seconds, the Parent Unit will find the Nursery Unit. The Parent Unit will display "Nursery Unit found. Pairing complete." • The Parent Unit will begin monitoring normally. Nothing happened when I turned on the Nursery Unit. What do I do? • With the Parent Unit on, turn the Nursery Unit off, and then - Graco 2797VIB3 | Instruction Manual - Page 35
Replacement Parts Warranty Information (USA) To purchase parts or accessories or for warranty information in the United States, please contact us at the following: Graco Children's Products 150 Oaklands Blvd. Exton, PA 19341 www.gracobaby.com or 1-800-345-4109 Product Registration (USA) To register - Graco 2797VIB3 | Instruction Manual - Page 36
R R MANUAL DE DUEÑO Guarde las instrucciones para uso futuro. ©2008 Graco ISPM024BA 3/08 - Graco 2797VIB3 | Instruction Manual - Page 37
de armado podría resultar en lesiones serias o la muerte. Este dispositivo ha sido diseñado para ayudar a monitorizar a su niño. Cuando usa el monitor, todavía debe proporcionar la supervisión necesaria para la continua seguridad de su niño. Este producto no ha sido diseñado ni debe usarse como un - Graco 2797VIB3 | Instruction Manual - Page 38
• NO sumerja ninguna parte de la unidad para el dormitorio, unidades para padres o estación de conexión en agua. Límpiela solamente con un trapo seco. • NO ponga la unidad cerca del agua o humedad. No use la unidad para el dormitorio a la intemperie. No use la unidad para el dormitorio cerca de - Graco 2797VIB3 | Instruction Manual - Page 39
NOTA: Este equipo ha sido probado y se ha determinado que cumple con los límites de un dispositivo digital Clase B, según la parte 15 de las normas de la FCC. Estos límites han sido creados para proporcionar una protección razonable contra la peligrosa interferencia en una instalación residencial. - Graco 2797VIB3 | Instruction Manual - Page 40
que lo arme un adulto. Herramienta requerida: Destornillador Phillips R Digital Color Video Baby Monitor Quick Start Product Instruction Manual Unidad para padres (A6402) OWNER'S MANUAL Keep instructions for future use. Manual de activación rápida Pila de la unidad para padres R Unidad para el - Graco 2797VIB3 | Instruction Manual - Page 41
Unidad para padres LUZ DE CONEXIÓN (pg13) ANTENA SUBIR EL VOLUMEN (pg24) BAJAR EL VOLUMEN (pg24) LUCES SONORAS PANTALLA LCD ARRIBA(pg15) ABAJO (pg15) ENCENDIDO /APAGADO (pg13) ENCHUFE DEL ADAPTADOR DE CA (pg8) LUZ DE LA SITUACIÓN DE CARGA (pg25) BIEN (pg15) ENCENDIDO /APAGADO DEL VIDEO (pg14) - Graco 2797VIB3 | Instruction Manual - Page 42
Instalación de las pilas 1 La pila debe estar instalada en la unidad para padres antes de que la unidad esté lista para su uso. Saque la tapa de la pila en la unidad para padres deslizándola hacia abajo. 2 Enchufe la pila en la ranura mostrada en el n.° 2. 3 Ponga el paquete de pilas en - Graco 2797VIB3 | Instruction Manual - Page 43
4 Vuelva a instalar la puerta de las pilas. 5 R Conecte el adaptador de CA a la unidad y enchúfelo en la pared para cargar la pila. Cargue la pila durante 3 horas. R NOTA: Asegúrese de usar el adaptador con el extremo en "L" como se indica aquí. 8 - Graco 2797VIB3 | Instruction Manual - Page 44
Unidad para el dormitorio CÁMARA DE VIDEO MICRÓFONO PILAS (pg10) LUZ INDICADORA DE ENCENDIDO (pg26) ENCENDIDO /APAGADO (pg12) R ENCHUFE DEL ADAPTADOR DE CA (pg11) 9 - Graco 2797VIB3 | Instruction Manual - Page 45
Instalación de las pilas Use el adaptador de corriente 6 alternada para el uso normal con electricidad - las pilas tienen por objeto ser respaldo en caso de que se corte la electricidad. (Opcional) Use un destornillador Phillips para sacar la tapa de las pilas. NOTA: El tornillo debe - Graco 2797VIB3 | Instruction Manual - Page 46
Instalación de la unidad de base del dormitorio 8 Conecte el adaptador de CA a la parte trasera de la unidad de base del dormitorio y enchúfela en la pared. NOTA: Asegúrese de usar el adaptador con el extremo recto como se indica aquí. 9 Monte la unidad para el dormitorio sobre la base - Graco 2797VIB3 | Instruction Manual - Page 47
Encendido/apagado de la unidad para el dormitorio 10 Oprima el botón durante 1 segundo para encender la cámara. R 11 R Para cambiar el ángulo de la cámara, gire la parte de arriba de la unidad para el dormitorio en la dirección deseada. Por favor, note que la cámara no puede girar - Graco 2797VIB3 | Instruction Manual - Page 48
Encendido/apagado de la unidad para padres 12 R Oprima y mantenga oprimido el botón de Encendido/Apagado durante 1 segundo. La unidad pasará por el ciclo de introducción y comenzará a buscar la unidad para el dormitorio. Luz de Conexión 13 R Asegúrese de que la unidad del dormitorio esté - Graco 2797VIB3 | Instruction Manual - Page 49
14 R Oprima y mantenga oprimido el botón de Encendido/Apagado durante 1 segundo para apagar la unidad. 15 R Para activar o desactivar la entrada de video, oprima el botón de video. Oprimir el botón de video permitirá al usuario ver la imagen de la unidad para el dormitorio. 14 - Graco 2797VIB3 | Instruction Manual - Page 50
16 R Para programar las preferencias, oprima el botón "OK". 17 R Para pasar por las diferentes opciones, oprima arriba o abajo. 18 R Después de elegir una de las opciones, oprima el botón "OK" para activar la selección. NOTE: Una vez que haya hecho su selección (OK), la unidad avanzará automá - Graco 2797VIB3 | Instruction Manual - Page 51
de las 5 posiciones 9:22pm Use ARRIBA/ABAJO para elegir, OK para seleccionar 21 El icono del Zoom aparecerá arriba de la pantalla de situación. El monitor volverá al video en vivo si está disponible. 9:22pm 16 - Graco 2797VIB3 | Instruction Manual - Page 52
Menú. Oprima Arriba/Abajo para elegir el icono Zoom out. Oprima "OK" para seleccionarla. 9:22pm Use UP/DOWN to choose, OK to select 23 El monitor volverá al video en vivo si está disponible. El icono del Zoom no estará visible en la pantalla de situación. 9:22pm 17 - Graco 2797VIB3 | Instruction Manual - Page 53
/pm) 24 Hour seleccionarlo. 9:22pm 26 Oprima Arriba/Abajo para ajustar el primer dígito. Oprima "OK" para pasar al dígito 07 :32 pm siguiente. El monitor volverá al video en vivo después del ajuste de todos los dígitos. 9:22pm 18 - Graco 2797VIB3 | Instruction Manual - Page 54
. Alarma activada Alarma deactivada 9:22pm 29 Oprima Arriba/Abajo para ajustar el primer dígito. Oprima "OK" para pasar al dígito 07:22 PM siguiente. El monitor volverá al video en vivo después del ajuste de todos los dígitos. 9:22pm 19 - Graco 2797VIB3 | Instruction Manual - Page 55
30 31 R El icono del Reloj alarma aparecerá al fondo de la pantalla, al lado de la hora. NOTA: Si el icono del Reloj alarma no está visible, no está activado. 9:22pm Para cancelar la Alarma, oprima cualquier botón. NOTA: La Alarma sonará cada día a la hora preseleccionada hasta que se cancele la - Graco 2797VIB3 | Instruction Manual - Page 56
Brillo. Oprima "OK" para seleccionarla. 9:22pm 33 Use Arriba/Abajo para elegir el nivel de brillo, "OK" para seleccionar 10 (10 niveles en total) El monitor volverá al video en 9:22pm vivo después del ajuste de todos los dígitos. 21 - Graco 2797VIB3 | Instruction Manual - Page 57
Idioma 34 Oprima "OK" para abrir el Menú. Oprima Arriba/Abajo para elegir el icono Idioma. Oprima "OK" para seleccionarla. 9:22pm 35 Use Arriba/Abajo para elegir, "OK" para seleccionar English Français Espanol 9:22pm El monitor volverá al video en vivo después de seleccionar un idioma. 22 - Graco 2797VIB3 | Instruction Manual - Page 58
Vibration 36 Oprima "OK" para abrir el Menú. Oprima Arriba/Abajo para elegir el icono Vibración. Oprima "OK" para seleccionarla. 9:22pm 37 Use Arriba/Abajo para - Graco 2797VIB3 | Instruction Manual - Page 59
Subir/bajar el volumen 38 SUBIR EL VOLUMEN BAJAR EL VOLUMEN • Oprima el botón Subir/Bajar el Volumen para cambiar el Volumen. 24 - Graco 2797VIB3 | Instruction Manual - Page 60
El icono de la pila cambiará mientras se cargan las pilas. • Cuando las pilas están descargadas, el icono de las pilas destellará y el monitor emitirá un sonido cada minuto. • Cuando las pilas están extremadamente descargadas, la pantalla mostrará la advertencia, "Las pilas están muy descargadas - Graco 2797VIB3 | Instruction Manual - Page 61
Cómo cargar la pila de la unidad para padres • Enchufe el adaptador de CA en la unidad para padres para comenzar a cargar las pilas. • La luz de carga se prenderá roja mientras se cargan las pilas, verdes cuando las pilas estén totalmente cargadas. La luz de carga se puede ver fácilmente cuando - Graco 2797VIB3 | Instruction Manual - Page 62
Accesorios/Montante de pared y traba para el cinturón Instale el montante para la 40 pared usando un tornillo n.° 6 y sujetador para yeso (no se incluyen). Asegúrese de que todos los cordones estén lejos del alcance del niño. Asegúrese que haya un tomacorriente disponible para enchufar el - Graco 2797VIB3 | Instruction Manual - Page 63
Solución de desperfectos La mayoría de los problemas tienen una simple solución. Primero, verifique que: • La electricidad esté ENCENDIDA en ambas unidades Ambas unidades estén enchufadas (o que las pilas están nuevas en la unidad para el dormitorio y totalmente cargadas en la unidad para padres) • - Graco 2797VIB3 | Instruction Manual - Page 64
Sonido débil, estática o video pobre. • La unidad para el dormitorio está demasiado lejos del bebé - muévala más cerca. • La unidad para padres está demasiado lejos de la unidad para el dormitorio - muévala más cerca. • Objetos grandes bloquean la señal - trate de poner la unidad para el dormitorio - Graco 2797VIB3 | Instruction Manual - Page 65
Programación de la unidad para padres y unidad para niños Para asegurar la privacidad, la unidad para padres se programa con su unidad del dormitorio en la fábrica. Su unidad para padres no funcionará con ninguna otra unidad del dormitorio. Si su unidad para padres no se conecta con su unidad del - Graco 2797VIB3 | Instruction Manual - Page 66
2. Programación de la unidad para padres con la unidad del dormitorio • Si la unidad para padres no está encendida, enciéndala ahora. • La unidad para padres mostrará "Buscando una unidad del dormitorio con la que programarse. Encienda la unidad del dormitorio ahora." • Ponga la unidad del - Graco 2797VIB3 | Instruction Manual - Page 67
Children's Products 150 Oaklands Blvd. Exton, PA 19341 www.gracobaby.com o 1-800-345-4109 Registro del producto (EE.UU.) Para registrar su producto Graco desde dentro de los EE.UU., visítenos en línea en www.gracobaby.com/productregistration. Actualmente no aceptamos registros de los productos de
-
 1
1 -
 2
2 -
 3
3 -
 4
4 -
 5
5 -
 6
6 -
 7
7 -
8
-
9
-
10
-
11
-
12
-
13
-
14
-
15
-
16
-
17
-
18
-
19
-
20
-
21
-
22
-
23
-
24
-
25
-
26
-
27
-
28
-
29
-
30
-
31
-
32
-
33
-
34
-
35
-
36
-
37
-
38
-
39
-
40
-
41
-
42
-
43
-
44
-
45
-
46
-
47
-
48
-
49
-
50
-
51
-
52
-
53
-
54
-
55
-
56
-
57
-
58
-
59
-
60
-
61
-
62
-
63
-
64
-
65
-
66
-
67
 |
 |
Q
u
Q
Q
ick Start
Product Instruction Manual
MODEL# 2797VIB3
LCD SCREEN: QUICK REFERENCE GUIDE
Parent Unit
1
Depress for 1 sec. to turn camera on.
2
Place camera facing baby.
3
Open monitor and press
power button for 1 sec. to turn on.
LCD
SCREEN
To cycle through the different choices, press up or down.
To cycle through the different choices, press up or down.
No Signal
Activating Units
4
Parent unit will begin search
and activate video.
O
p
e
n
Power Button
VOLUME
©2008 Graco
ISPM023AA
03/08
9:22pm
9:22pm
9:22pm
9:22pm
9:22pm
9:22pm
9:22pm
9:22pm
9:22pm
12 Hour(am/pm)
24 Hour
07:32 pm
Alarm On
Alarm Off
06: 15 am
English
Français
Español
Vibe on
Vibe off
10
1
Remove battery door.
2
Plug battery in.
3
Replace battery door.
4
Parent unit & nursery unit
are ready for use.
2
Install 3 AAA (LR03) batteries
(optional) Batteries not included.
1
Remove battery door (optional).
3
Connect AC adapter and place
nursery unit on base.
Parent Unit
Nursery Unit
4
To charge battery, connect
the AC adapter to the monitor
and charge for 3 hours.