HTC One VX Quick Start Guide - Page 1
HTC One VX Manual
 |
View all HTC One VX manuals
Add to My Manuals
Save this manual to your list of manuals |
Page 1 highlights
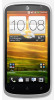
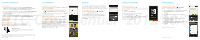
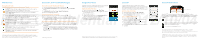
Quick Start HTC Getting to Know Your Phone Setting up Your Phone Headphone jack Notification LED Earpiece Power Front camera Insert the microSIM card 1 Take the back cover off. 2 Insert the microSIM card (gold contacts facing down) into the microSIM card slot. Charge the phone 1 Connect the USB cable to your phone. Confidential Touch screen Volume up Volume down 3 Push the microSIM card in until it clicks into place. 2 Plug in the power adapter to an electrical outlet to start charging. Home Back Charger / USB port Recent apps For more information, visit att.com/DeviceSupport Important: Please use the power adapter and USB cable that came in the box for optimum battery performance. Phone Basics Touch Screen and Navigation Get started Navigate your phone Press and hold the power button on the top panel. • Use your fingertip to lightly tap the screen and To lock, briefly press the power button. select options. To unlock, press the power button, then drag the ring up. • Use quick flicks of your finger to scroll up/down and left/right. 2012/10/04 Ready2Go AT&T Ready2Go helps you set up your device using your computer. • Configure email, contacts and Wi-Fi. • Customize your home screen, wallpaper, ringtones, and more. When you first turn on the phone, you'll see the AT&T Ready2Go wizard. • All Apps Key: Opens a screen to all of your applications. • Back Key: Returns to previous screen. • Home Key: Takes you to the main Home screen. • Recent apps Key: Shows you apps you've recently used. • Notifications bar: Shows you timely information, like new message and social 1 Tap Get Started. You'll see a web address and code. network notifications, missed calls, and calendar 2 On your computer's browser, go to the web page. reminders. Touch the bar and slide it down with Slide your finger 3 Enter the code from your phone on the web page. 4 Complete the steps to send your personalization options to your phone. your finger to see full details. Tap the Back to close the bar. key horizontally to the left or right and you'll discover more space for adding icons, widgets, and more.
-
 1
1 -
 2
2 -
 3
3 -
 4
4
 |
 |
