HTC Touch Diamond Sprint Sprint Touch Diamond Internal Storage HotFix - Page 110
Synchronizing Video and Audio Files, Synchronizing Content to Your Device Automatically
 |
View all HTC Touch Diamond Sprint manuals
Add to My Manuals
Save this manual to your list of manuals |
Page 110 highlights
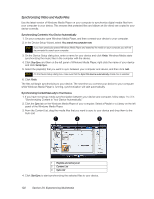
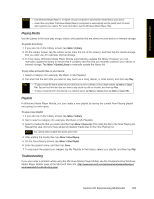
Synchronizing Video and Audio Files Use the latest version of Windows Media Player on your computer to synchronize digital media files from your computer to your device. This ensures that protected files and album art (for skins) are copied to your device correctly. Synchronizing Content to Your Device Automatically 1. On your computer, open Windows Media Player, and then connect your device to your computer. 2. In the Device Setup Wizard, select Yes, search my computer now. Note If you have previously opened Windows Media Player and searched for media on your computer, you will not be prompted to search your computer. 3. On the Device Setup dialog box, enter a name for your device and click Finish. Windows Media starts synchronizing the music files in the computer with the device. 4. Click Stop Sync and then on the left panel of Windows Media Player, right-click the name of your device and click Set Up Sync. 5. Select the playlist(s) that you want to sync between your computer and device, and then click Add. Note On the Device Setup dialog box, make sure that the Sync this device automatically check box is selected. 6. Click Finish. The files will begin synchronizing to your device. The next time you connect your device to your computer while Windows Media Player is running, synchronization will start automatically. Synchronizing Content Manually to Your Device 1. If you have not set up media synchronization between your device and computer, follow steps 1 to 3 in "Synchronizing Content to Your Device Automatically." 2. Click the Sync tab on the Windows Media Player of your computer. Select a Playlist or a Library on the left panel of the Windows Media Player. 3. From the Content List, drag the media files that you want to sync to your device and drop them to the Sync List. 1 2 3 1 Playlists and Library List 2 Content List 3 Sync List 4. Click Start Sync to start synchronizing the selected files to your device. 102 Section 2H. Experiencing Multimedia
-
 1
1 -
2
-
3
-
4
-
5
-
6
-
7
-
8
-
9
-
10
-
11
-
12
-
13
-
14
-
15
-
16
-
17
-
18
-
19
-
20
-
21
-
22
-
23
-
24
-
25
-
26
-
27
-
28
-
29
-
30
-
31
-
32
-
33
-
34
-
35
-
36
-
37
-
38
-
39
-
40
-
41
-
42
-
43
-
44
-
45
-
46
-
47
-
48
-
49
-
50
-
51
-
52
-
53
-
54
-
55
-
56
-
57
-
58
-
59
-
60
-
61
-
62
-
63
-
64
-
65
-
66
-
67
-
68
-
69
-
70
-
71
-
72
-
73
-
74
-
75
-
76
-
77
-
78
-
79
-
80
-
81
-
82
-
83
-
84
-
85
-
86
-
87
-
88
-
89
-
90
-
91
-
92
-
93
-
94
-
95
-
96
-
97
-
98
-
99
-
100
-
101
-
102
-
103
-
104
-
 105
105 -
 106
106 -
 107
107 -
 108
108 -
 109
109 -
 110
110 -
 111
111 -
 112
112 -
 113
113 -
 114
114 -
 115
115 -
116
-
117
-
118
-
119
-
120
-
121
-
122
-
123
-
124
-
125
-
126
-
127
-
128
-
129
-
130
-
131
-
132
-
133
-
134
-
135
-
136
-
137
-
138
-
139
-
140
-
141
-
142
-
143
-
144
-
145
-
146
-
147
-
148
-
149
-
150
-
151
-
152
-
153
-
154
-
155
-
156
-
157
-
158
-
159
-
160
-
161
-
162
-
163
-
164
-
165
-
166
-
167
-
168
-
169
-
170
-
171
-
172
-
173
-
174
-
175
-
176
-
177
-
178
-
179
-
180
-
181
-
182
-
183
-
184
-
185
-
186
-
187
-
188
-
189
-
190
-
191
-
192
-
193
-
194
-
195
-
196
-
197
-
198
-
199
-
200
-
201
-
202
-
203
-
204
-
205
-
206
-
207
-
208
-
209
-
210
 |
 |
