Haier DSF80B User Manual - Page 7
Special notices, Installation method
 |
View all Haier DSF80B manuals
Add to My Manuals
Save this manual to your list of manuals |
Page 7 highlights
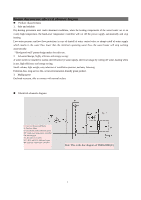
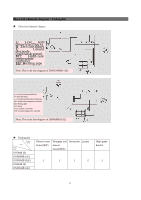
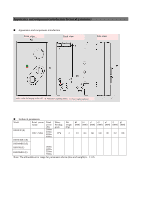
3 Special notices·Installation method „ Special notices In order to guarantee the correct and safe application of the water heater, our company here notifies customers that it is necessary to contact the professional service providers specified by Haier for home service. In case of incorrect installation of the water heater, our company undertakes no responsibility. z Ensure the water supply of the machine before powering it on; otherwise, it may cause faults in the machine components. Ensure that air switch meets the national standard and is reliably grounded; it is forbidden to use the water heater in case of unreliable grounding. z When the electric water heater is seriously eroded by water, it can be cleaned up for reuse only if it is inspected and accepted by our company's technical personnel. z Don't place inflammable articles such as gasoline nearby the water heater; otherwise, accidents such as fire hazards may take place. „ Installation method z It must be installed by professional installation personnel of our company's after sales service department or specified installation personnel. z The water heater should be hung vertically on the wall and installed closely against the wall; it is forbidden to be installed inversely or horizontally to ensure the sensitivity of the water flow switch. ‹ Waterway installation: z Before installation of the water heater, first carry out waterway installation, the installation method as follows: z First, determine the installation position of the water heater. According to the installation dimensional drawing, drill three holes Air switch with aФ4mm and the depth of 30mm in the wall; plug the plastic expanding tubes into the holes A, B, and C (see the back view in P3); then, screw bolts into the plastic expanding tubes in the upper and right holes (don't screw them in completely to facilitate Hot water outlet machine hanging); and fix these bolts firmly. Then, lift the water heater and hang the back shell of the machine on the bolts; screw another bolt into the plastic expanding pipe C and screw it firm. At Cold water inlet last, assemble the front shell of the machine and fix them with bolts. z There are the words "inlet" and "outlet" printed at the bottom of the water heater. First, install the filter screen at the intake pipe; and then, connect the intake pipe with the outflow pipe and the shower nozzle; the joints must be cushioned with seal rings to prevent water leakage; the installation refers to the drawing above. z Note: The hot water pipe should not be too long so as to avoid heat loss. z When installing the water heater, there should be certain space set aside to facilitate future repair & maintenance . ‹ Circuit installation z After the completion of waterway installation, test whether water can flow freely in the pipes; carry out circuit installation if there is no water leakage. Select proper air switch and power line according to the power of the water heater; the power line should be connected with the water heater through the air switch. Be aware of the difference among the live wires (brown/red/black), the zero line (blue) and the ground wire (yellowish green).
-
 1
1 -
 2
2 -
 3
3 -
 4
4 -
 5
5 -
 6
6 -
 7
7 -
 8
8 -
 9
9 -
 10
10 -
 11
11 -
 12
12 -
13
 |
 |
