Haier HLTW600AXW User Manual - Page 9
Installation Steps, STEP 4: Leveling your washer, STEP 5: Powering your washer, STEP 6: Running - washing machine
 |
View all Haier HLTW600AXW manuals
Add to My Manuals
Save this manual to your list of manuals |
Page 9 highlights
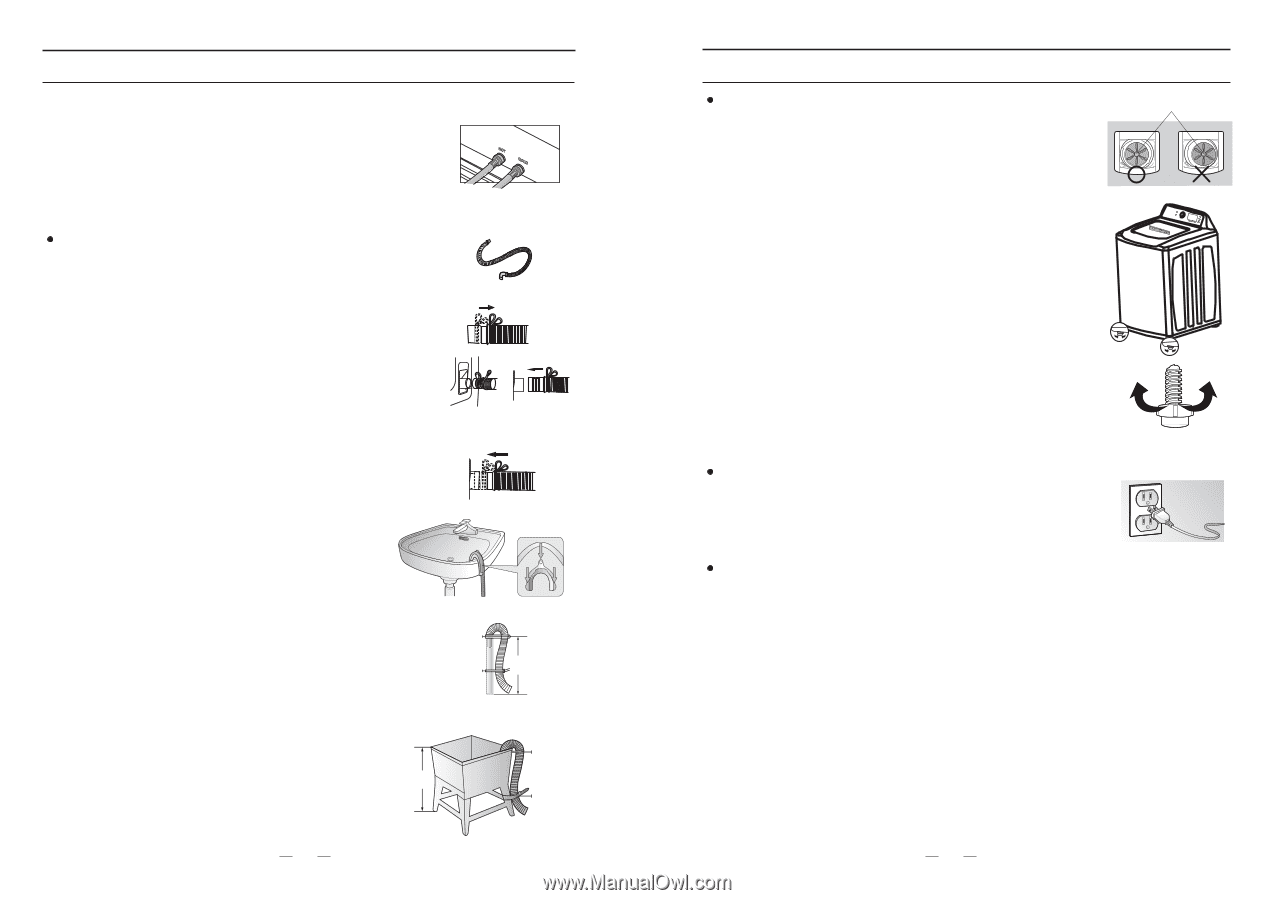
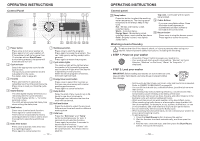
INSTALLATION INSTRUCTIONS Installation Steps IMPORTANT: To ensure the correct water usage, connect both the HOT and COLD water faucets. If either or both are not connected, an error code can occur. If you do not want to use the HOT water supply hose, insert the water intake cap into the HOT water supply intake hole. In this case, you must select the Tap Cold option for the water temperature. 6. Turn on the HOT and COLD water supplies and check all the water supply intake connections and the faucets for water leaks. STEP 3: Connect the drain hose 1. Connect the drain pipe onto your washer. The drain pipe is attached as accessory with your washer. A. Find the hoop on one end of the drain hose. Move the hoop forward as shown in right figure. B. Insert the end with hoop onto the washer. Be sure to slide the drain hose over the sewer completely. C. Move the hoop backward to fix the drain hose onto the washer tightly. Move the hoop forward IMPORTANT: Failure to slide the drain hose over the sewer completely may result in water leakage. Failure to move the hoop back will result in water leakage. Insert the drain hose onto the unit. Move the hoop backward 2. Position the other end of the drain hose. It can be positioned in three ways. A. Over the edge of a wash basin Secure the guide to the side of the basin wall with a hook or to the tap with a piece of string to prevent the drain hose from moving. B. In a standpipe The standpipe must be no shorter than 39 in. (99cm) and no longer than 96 in. (245cm). Standpipe Hose Retainer Tie strap 96 in. Max 39 in. Min C. in a laundry tub. The laundry tub must be no shorter than 39 in. (99cm) and no higher than 96 in. (245cm). IMPORTANT: Make sure that the connection between the drain hose and the wash basin, or standpipe, or laundry tub is not airtight. 96 in. Max 39 in. Min Laundry tub Hose Retainer Tie strap 15 INSTALLATION INSTRUCTIONS Installation Steps STEP 4: Leveling your washer See if the washer is level by checking the position of the tub or using a leveling gauge. 1. Slide the washer into position. 2. Open the lid of the washer, and pour the water into the tub to just below the pulsator level. Pulsator 3. If the washer is level, the pulsator is positioned at the center of the washer as shown in the figure right. If not, level your washer by turning the front leveling feet clockwise or counterclockwise as necessary. IMPORTANT: DO NOT use the washing machine without leveling. It may result in malfunction caused by the production of excess vibration and noise. Use the leveling feet only when you level the washing machine . If you raise the leveling feet unnecessarily, it may cause abnormal vibration of the washing machine. loosen lock Adjustable legs STEP 5: Powering your washer Plug the power cord into a 3-prong, grounded 120Volt 60Hz approved electrical outlet protected by a 15-amp fuse or comparable circuit breaker. Your washer is grounded through the third prong of the power cord when plugged into a 3-prong grounded electrical outlet. STEP 6: Running a test cycle Run a test cycle as following to check if your washer is properly installed. 1. Load about 6 pounds of laundry into the tub. 2. Press the Power button to turn on your washer. 3. Select the Rinse+Spin cycle by turning the Cycle Selector. 4. Press the Start/Pause button to start the test cycle. 5. The washer should not rock or vibrate excessively when water is supplied or when washing or spinning, and should drain well during the spin cycle. IMPORTANT: If water leaks while water is being supplied or drained, check the water connections. Refer to the "Connect the water hose" and "Connect the drain hose" section for instructions. If the washer rocks and vibrates excessively, level your washer again. Refer to the "Leveling your washer" section for instructions. 16
-
 1
1 -
2
-
3
-
 4
4 -
 5
5 -
 6
6 -
 7
7 -
 8
8 -
 9
9 -
 10
10 -
 11
11 -
 12
12 -
 13
13 -
 14
14 -
15
-
16
-
17
-
18
-
19
-
20
-
21
-
22
-
23
-
24
-
25
-
26
-
27
-
28
-
29
-
30
-
31
-
32
-
33
-
34
-
35
-
36
-
37
-
38
-
39
-
40
-
41
-
42
-
43
-
44
-
45
-
46
 |
 |