Haier HPU-24C03 User Manual - Page 17
TIMER On-Off Operation
 |
View all Haier HPU-24C03 manuals
Add to My Manuals
Save this manual to your list of manuals |
Page 17 highlights
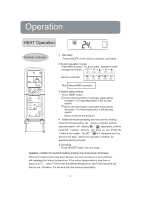
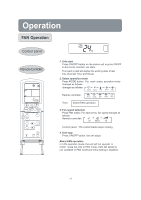
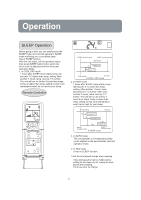
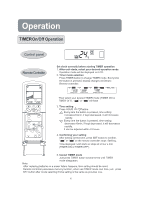
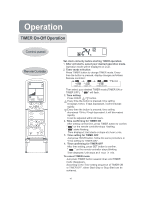
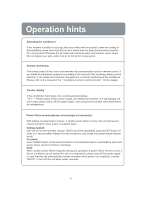
Operation TIMER On-Off Operation Control panel Remote Controller E.HEAT Set clock correctly before starting TIMER operation. 1. After unit starts, select your desired operation mode. Operation mode will be displayed on LCD. 2. Timer mode selection Press TIMER button to change TIMER mode. Every time the button is pressed, display changes as follows: Remote controller: 0/ 0'' 0/ 0'' Then select your desired TIMER mode (TIMER ON or TIMER OFF). " 0/ " will flash. 3. Time setting Press HOUR / button. Every time the button is pressed, time setting increases 10min, if kept depressed, it will increases rapidly. Every time the button is pressed, time setting decreases 10min, if kept depressed, it will decreases rapidlly. It can be adjusted within 24 hours. 4. Time confirming for TIMER ON After setting correct time, press TIMER button to confirm. " 0/ " on the remote controller stops flashing. " 0'' " starts flashing. Time displayed: Unit starts or stops at x hour x min. 5. Time setting for TIMER OFF Just press HOUR button, follow the same procedure in "Time setting for TIMER ON ". 6. Time confirming for TIMER OFF After time setting, press SET button to confirm. " 0'' " on the remote controller stops blinking. Time displayed: Unit stops at X hour X min. To cancel TIMER mode Just press TIMER button several times until TIMER mode disappears. According to the Time setting sequence of TIMER ON or TIMER OFF, either Start-Stop or Stop-Start can be achieved. 16
-
 1
1 -
2
-
3
-
4
-
5
-
6
-
7
-
8
-
9
-
10
-
11
-
 12
12 -
 13
13 -
 14
14 -
 15
15 -
 16
16 -
 17
17 -
 18
18 -
 19
19 -
 20
20 -
 21
21 -
 22
22 -
23
-
24
-
25
-
26
-
27
-
28
 |
 |