Haier HWM65-187S User Manual - Page 8
Installation And Accessory Parts
 |
View all Haier HWM65-187S manuals
Add to My Manuals
Save this manual to your list of manuals |
Page 8 highlights
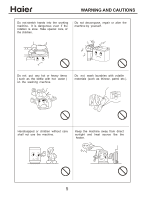
INSTALLATION AND ACCESSORY PARTS Figure 1 indicates the ex factory installation position of the drain hose. Soft item Extend the drain hose from the side of spin tub. Put soft items on the ground. Lean the machine down gently with the front surface facing the ground. Take off the drain hose from the cabinet. Take the hose out of the fixing groove. (See to Figure 3). Figure 1 Soft item Embed the drain hose into the groove along the side of the spin tub in the order of (1)~(3), heading for the side of the spin tub. (See to Figure 3). Figure 2 Embed the drain hose into the groove with hands. Take care not to damage the drain hose in fastening the fixing clamp. Extend to the spin tub side Figure 3 Embed into the groove in turn 7
-
 1
1 -
2
-
 3
3 -
 4
4 -
 5
5 -
 6
6 -
 7
7 -
 8
8 -
 9
9 -
 10
10 -
 11
11 -
 12
12 -
 13
13 -
14
-
15
-
16
-
17
 |
 |

7
INSTALLATION AND ACCESSORY PARTS
Figure 1 indicates the ex factory installation
position of the drain hose.
Figure 1
Soft item
Extend the drain hose from the side of spin tub.
Put soft items on the ground. Lean the machine
down gently with the front surface facing the
ground. Take off the drain hose from the cabinet.
Take the hose out of the fixing groove.
(See to Figure 3).
Embed the drain hose into the groove along the side
of the spin tub in the order of (1)~(3), heading for the
side of the spin tub. (See to Figure 3).
Embed the drain hose into the groove with
hands. Take care not to damage the drain
hose in fastening the fixing clamp.
Soft item
Figure 2
Figure 3
Embed into the
groove in turn
Extend to the
spin tub side