Hamilton Beach 35137 Use & Care - Page 4
How to Assemble and Fry - model
 |
UPC - 040094351374
View all Hamilton Beach 35137 manuals
Add to My Manuals
Save this manual to your list of manuals |
Page 4 highlights
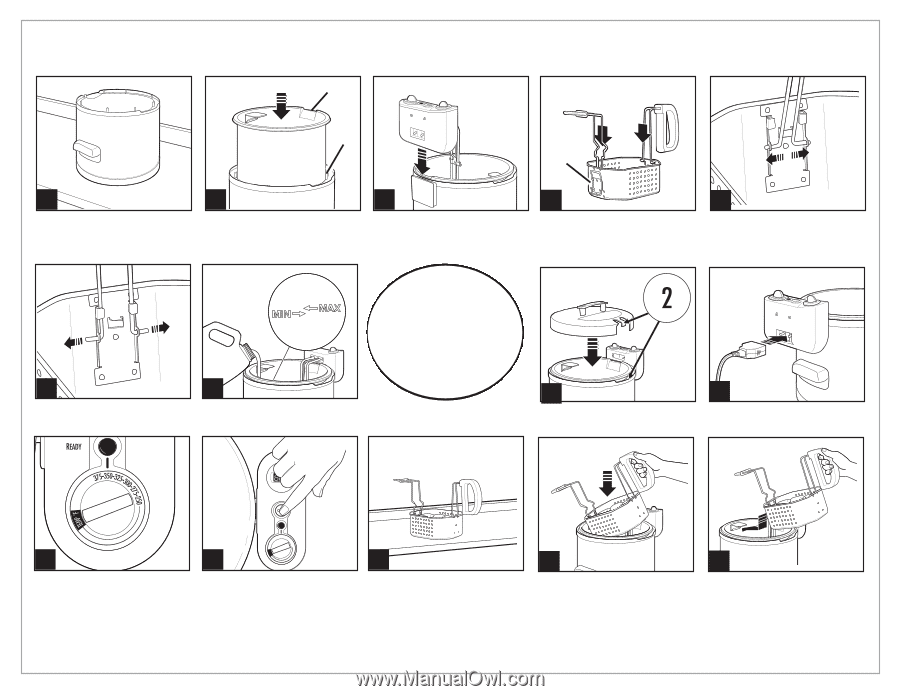
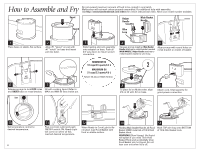
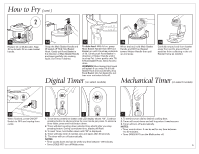
How to Assemble and Fry Do not exceed maximum amount of food to be cooked in one batch. Multicooker will not work unless properly assembled. For additional help with assembly, visit http://www.hamiltonbeach.com/videos for a short instructional video. Have your model number available. Spout Helper Handle Main Basket Handle Notch 1 Place base on stable, flat surface. 2 Align #1 "spout" on pot with #1 "notch" on base and insert pot into base. 3 Slide heating element assembly onto adapter on base. Push all the way down to ensure power connection. Wire Loop MAIN HANDLE 4 5 Squeeze prongs together. Main Basket Handle attaches to metal bracket marked MAIN HANDLE. Helper Handle attaches to metal bracket closest to wire loop. Align prongs with round holes on metal bracket on inside of basket. MAIN HANDLE 6 7 Release prongs to lock INTO holes Fill with cooking liquid. Refer to and UNDER tabs on metal bracket. MAX and MIN fill lines inside pot. MINIMUM Oil 18 cups/4.5 quarts/4.3 L MAXIMUM Oil 21 cups/5.2 quarts/4.9 L Never fill above MAX fill line. 8 To place lid on Multicooker, align #2 on lid with #2 on base. 9 Attach cord. Seat squarely for good power connection. 10 Set temperature control to desired temperature. 4 11 Plug cord into outlet and push ON/OFF switch ON. Ready Light will come on when oil has reached desired temperature. 12 When Ready to Cook Light is illuminated, load Food Basket with food on stable surface. 13 14 Holding Main Basket Handle, tilt Food Basket UNDER metal tab of Tilt & Hold Basket Hook. WARNING! Burn Hazard. Hot liquid will splash if you miss Tilt & Hold Basket Hook and accidentally drop Food Basket into hot liquid. Do not lean over unit when lid is off. Hook TOP wire loop onto BOTTOM of Tilt & Hold basket hook.
-
 1
1 -
 2
2 -
 3
3 -
 4
4 -
 5
5 -
 6
6 -
 7
7 -
 8
8 -
 9
9 -
 10
10 -
11
-
12
-
13
-
14
-
15
-
16
-
17
-
18
-
19
-
20
-
21
-
22
-
23
-
24
-
25
-
26
-
27
-
28
-
29
-
30
-
31
-
32
-
33
-
34
-
35
-
36
-
37
-
38
-
39
-
40
-
41
-
42
-
43
-
44
 |
 |