Hamilton Beach 50256WV Use & Care - Page 8
How to Clean - model #
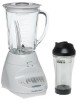 |
UPC - 040094502561
View all Hamilton Beach 50256WV manuals
Add to My Manuals
Save this manual to your list of manuals |
Page 8 highlights
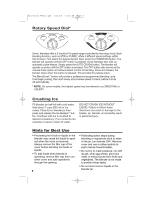
840133000 ENv02.qxd 2/24/05 10:50 AM Page 8 How to Clean 1. Unplug blender from electrical outlet. 2. Wipe blender base, control panel, and cord with a damp cloth or sponge. To remove stubborn spots, use a mild, non-abrasive cleanser. 3. To clean jar, unscrew safety base and remove cutting unit assembly from jar. 4. Carefully remove blades and gasket from bottom of safety base. 5. Carefully wash blades, safety base, gasket, jar (if plastic), and cover in hot, soapy water. Rinse and dry thoroughly. Do not soak. Glass jars may be washed in an automatic dishwasher. For Models with Safety Base: Do not wash blades, safety base, gasket, plastic jar, or lid in a dishwasher. For Models with Cutting Assembly: The filler cap, lid, jar, gasket, and cutting assembly may be washed in a dishwasher. 6. Reassemble cutting unit assembly onto jar, and replace jar onto blender base. 7. Store blender with lid ajar to prevent container odor. WARNING Electrical Shock Hazard • Disconnect power before cleaning. • Do not immerse cord, plug or base in any liquid. Failure to follow these instructions can result in death or electrical shock. Quick Clean The Quick Clean function should only be used to rinse the blender between batches of processing the same food. When the processing of a single type of food is finished, the blender should be disassembled and thoroughly cleaned as instructed in "How to Clean." To Quick Clean, pour 2 cups (500 ml) warm water in jar and add 1 drop liquid dishwashing detergent. Run the blender on QUICK CLEAN for 10 seconds. Discard soapy water. Rinse with clean water. This function is not a substitute for regular cleaning as instructed in "How to Clean." This function should never be used when blending any mixture containing eggs, milk, or any other dairy products, meats, or seafood. 8
-
 1
1 -
2
-
 3
3 -
 4
4 -
 5
5 -
 6
6 -
 7
7 -
 8
8 -
 9
9 -
 10
10 -
 11
11 -
 12
12 -
 13
13 -
14
-
15
-
16
-
17
-
18
-
19
-
20
-
21
-
22
-
23
-
24
-
25
-
26
-
27
-
28
-
29
-
30
-
31
-
32
 |
 |
