Hamilton Beach 908 Operation Manual - Page 8
Troubleshooting Guide, Replacement Parts, Maintenance - repair parts
 |
UPC - 040094040148
View all Hamilton Beach 908 manuals
Add to My Manuals
Save this manual to your list of manuals |
Page 8 highlights
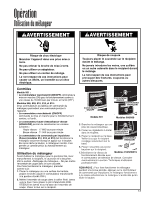
Caring for the Blender Troubleshooting Guide Problem . . . Blender fails to start or stops while it is running and cannot be restarted Solution . . . • Check to see if unit is securely plugged into an electric outlet. • Check to see if the fuse for the electric outlet has blown or if a circuit breaker has tripped. Ingredients will not mix properly • Check to see if enough liquid has been added to the ingredients. Mixture should be fluid and free-running at all times. • Solid pieces are too large. Pieces should not exceed 1″ (2.5 cm) cubes. • Container is too full. Do not fill past highest graduation marking. • Cutter unit blades are not sharp or are damaged. Inspect container and cutter assembly daily. Replace container and cutter assembly at least every 12 months or sooner if cutter assembly appears worn or damaged. • Check to see if cutter unit assembly is installed properly. • Select speed (on some models) to create a fluid blend. Maintenance Inspect the blender and its various parts and replace as follows: Daily Weekly Yearly Unplug the blender and remove the container from the base, and then inspect the container and cutter unit assembly for wear, nicks, and broken or loose blades. Replace if necessary. If the cutter assembly blades are loose, discontinue use immediately and replace the cutter assembly. Do not attempt to repair or tighten the cutter assembly. See "Replacement Parts" below. Unplug the blender, and then inspect the power cord insulation and power plug for cracks. Refer to "Requesting Assistance or Service" for repair or replacement. Replace the container and cutter unit assembly at least once a year. See "Replacement Parts" below. Replacement Parts Refer to "Requesting Assistance or Service" to order parts below. Model Part Description 901 1 container 908 1 container 909 1 container 910 1 container 918 1 container 919 1 container ALL Cutter unit assembly 8 Part Number 6126-901 6126-908 6126-909 6126-910 98000 98100 99100
-
 1
1 -
2
-
 3
3 -
 4
4 -
 5
5 -
 6
6 -
 7
7 -
 8
8 -
 9
9 -
 10
10 -
 11
11 -
 12
12 -
 13
13 -
14
-
15
-
16
-
17
-
18
-
19
-
20
-
21
-
22
-
23
-
24
-
25
-
26
-
27
-
28
 |
 |